The Rules engine is available as a separate plugin to Bluestone PIM.
You must be given explicit permission to view/create/edit rules.
Managed roles having access: Rules engine read, Rules engine write, Plugin admin and System admin.
Overview
Rules grid Actions Filters
Create a new rule
Add product relations Assign to category Change product status
Edit attribute value Generate PDF Sync products
AI enrich
Overview
The Rules engine allows you to automate different types of time-consuming tasks/actions. An action will be performed for the set of products matching the specified query. Currently, Bluestone PIM supports the following types of rules/actions:
- Add product relations
- AI enrich ℹ️ Available in Test only. Please contact us to try it out ℹ️
- Assign to category
- Change product status
- Edit attribute value
- Generate PDF
- Sync products
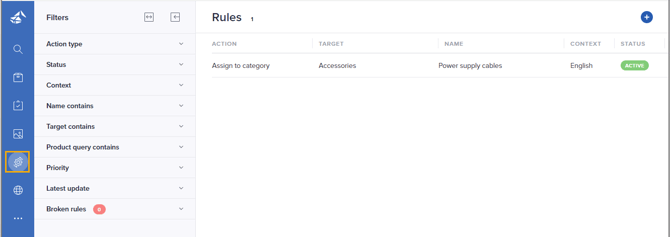
You can find the Rules engine as a separate module in the main navigation bar:
The page is divided into two main parts; the Filters panel and the Rules grid. See the following sections for details.
Tip! Find out how to customize the menu bar.
Rules grid
You can view all rules created within the organization from the grid. For each rule, the Action, Target, Name, Context, Status and Run time are presented.
Hover a rule and click the 3-dots menu on the right-hand side to access the following actions:
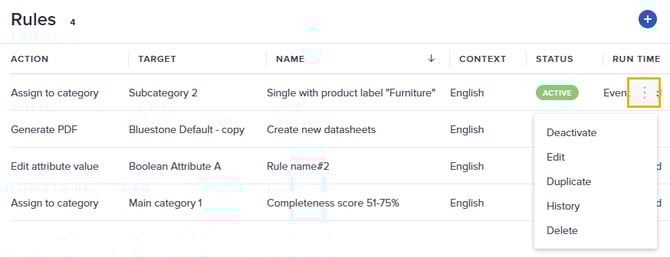
Actions
Activate/Deactivate
Allows you to deactivate an active rule, or vice versa.
Edit
Allows you to update the rule's main information and/or query.
Duplicate
Allows you to copy information from the rule into a new rule. The Target will not be copied for 'Assign to category' and 'Generate PDF' rules, as multiple rules for the same target are not allowed.
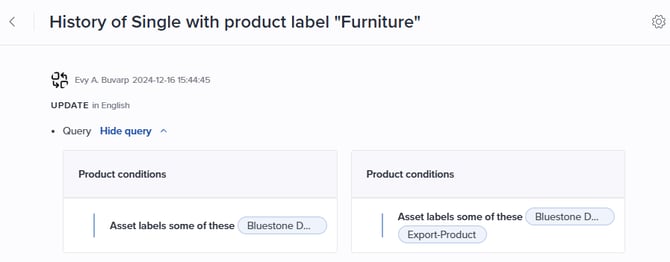
History
Allows you to view the history for each rule, including changes in the query:
Delete
Allows you to remove a rule. Confirm the deletion by clicking Yes in the pop-up.
Filters
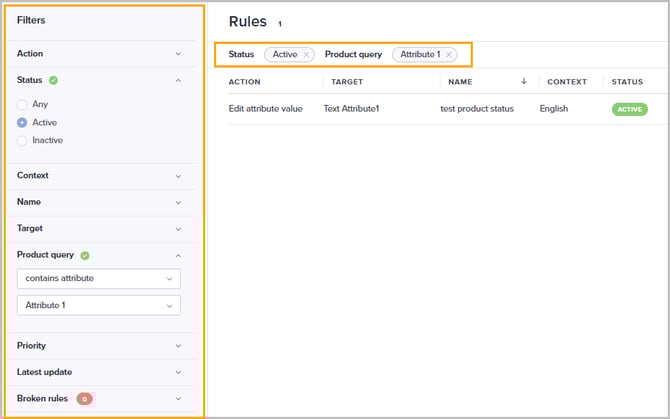
With a large number of rules, you can utilize Filters to find the rule(s) you are looking for.
Do the following:
- Click the relevant section in the Filters panel, e.g. Status, to expand it.
- Specify a filter criterion either by selecting a pre-defined value or typing a text, depending on the type of filter.
Tip! Use the Product query filter to quickly find rules based on attributes or attribute values used/not used in the connected query.
- Repeat steps 1 and 2 until you have added the required criteria.
- Click Apply filters at the bottom.
The rules matching your applied filter criteria are listed and the number of rules currently listed is presented in the header.
The applied filter criteria are presented above the grid. You can remove a specific filter criterion by clicking the 'x' in the pill for the relevant criteria.
Click Clear all to remove all filtering criteria.
Create a new rule
Follow these steps to create a new rule:
- Click the plus icon (Add new rule) in the upper right corner.

The Create new rule page is opened:
- Start by selecting the type of Action you want to automate.
- See the relevant section for details on how to proceed:
Add product relations
By creating a rule for automatically creating product relations, you can ensure that relevant product connections are established as soon as possible due to other data being added, updated, or removed in Bluestone PIM.
Note: The feature needs to be activated for your organization. Contact your system administrator if you need to request it.
Do the following to create a rule for automatically creating product relations:
- Select Add product relations as Action.
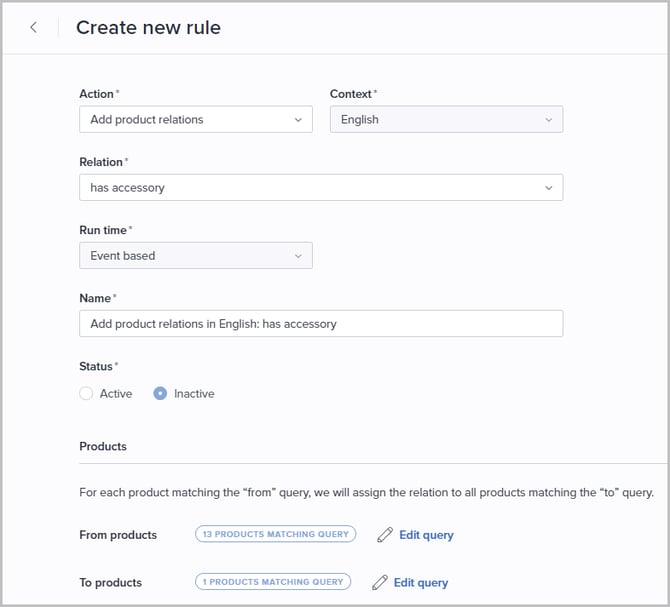
- The default Context is pre-selected.
- Select the relevant two-way Relation to be established.
- Run time is set to Event based as these rules will be evaluated for a product when given event(s) occur (ref. Create trigger events).
- Specify a Name for the rule.
- Set Status of the rule to Active if it should be executed immediately after saving it. You can leave it Inactive and activate it directly from the grid at a later stage, please see Actions.
- Specify which Products to be handled by the rule, i.e. between which products the relation should be established. For each product matching the From products query, the given relation will be established towards all products matching the To products query.
Click Edit query to define the conditions:
Tip! Please see Filtering using the query builder for details about how to build a query.
- Click Apply to save the query.
Tip! Once the query is saved, the number of products matching the query is presented in the Products section.
- In the Triggers section, specify which events that will cause the rule to be evaluated for a product.
Note! By default, Generate triggers from query is selected. This results in elements used in the query being added as triggers.
Alternatively, turn off automatically generating triggers to specify events manually instead. Please see Create trigger events for further details. - Click Save when you are done.
AI enrich
By creating automated enrichment rules, you can streamline your workflow and ensure that critical product information is always accurate and up to date.
Caution! To maintain data integrity and full control over your content, avoid using AI to overwrite attributes that contain manual entries.
Best Practice: Write AI-generated text to a dedicated attribute rather than your primary ones. For example, maintain both 'Description Manual' and 'Description AI'. This keeps your data safe and gives your frontend the flexibility to choose which version to display.
Note: The feature needs to be activated for your organization. Contact your system administrator if you need to request it.
Do the following to create a rule for automatically enriching products using AI:
- Select AI enrich in the Action field:
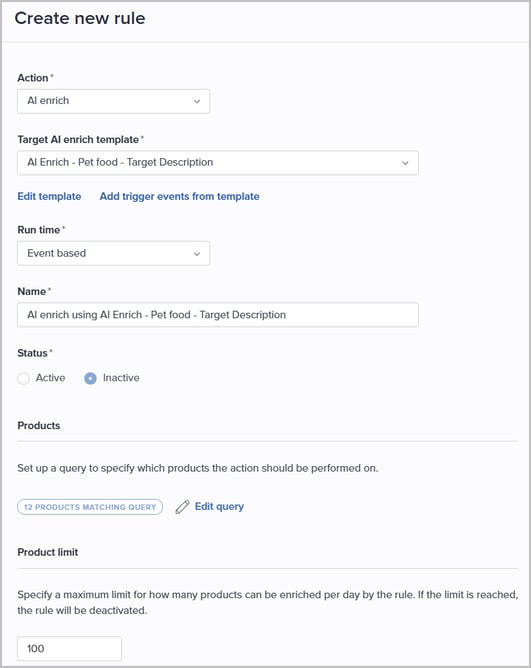
- Select the relevant Target AI enrich template. Please see AI setup templates for configuration details.
- Optionally click Edit template to make adjustments to the selected template.
- Optionally click Add trigger events from template, to automatically add rule triggers based on elements used in the template. Only relevant when Event based run time is selected.
- Select Run time:
- Event based: The rule will be evaluated for a product when the given event(s) occur (ref. Create trigger events).
- Scheduled hourly: The rule executes at hourly intervals (on the hour) following activation.
- Scheduled on selected days: Specify on which days and time of day to run the rule.
- Specify a Name for the rule.
- Set Status of the rule to Active if it should be executed immediately after saving it. You can leave it Inactive and activate it directly from the grid at a later stage, please see Actions.
- Click Edit query in the Products section to define conditions for products to be handled by the rule:

Tip! Please see Filtering using the query builder for details about how to build a query.
- Click Apply to save the query.
Tip! Once the query is saved, the number of products matching the query is presented in the Products section.
- In the Product limit section, define a maximum daily quota for product enrichment. The rule will automatically deactivate once this limit is reached. Manually re-activating the rule will reset the daily quota.
- If you have selected Event based run time, specify which events will cause the rule to be evaluated for a product in the Triggers section.
Note! By default, Generate triggers from query is selected. This results in elements used in the query being added as triggers.
Alternatively, turn off automatically generating triggers to specify events manually instead. Please see Create trigger events for further details. - Click Save when you are done.
Assign to category
By creating a rule for automatically assigning products to categories, you can make sure that your products are present in the correct catalogs/categories as a result of other data being added, updated or removed in Bluestone PIM.
Do the following to create a rule for automatically assigning (and opt. unassigning) products to categories:
- Select Assign to category in the Action field.

- Select the relevant Context.
- Select the relevant Target category. This is the category products matching the query will be assigned to.
- Optionally select Unassign products from the category if the conditions do not match, to automatically remove products from this category when they no longer match the query.
- Run time will be set to Event based. This means that the rule will be evaluated for a product when the given event(s) occur (ref. Create trigger events).
- Set relevant Run priority. This will determine when the rule will be executed. Rules in 'Priority group 1' will be run first, then the rules in 'Priority group 2' etc.
- Specify a Name for the rule.
- Set Status of the rule to Active if it should be executed immediately after saving it. You can leave it Inactive and activate it directly from the grid at a later stage, please see Actions.
- Click Edit query in the Products section to define conditions for products to be handled by the rule:
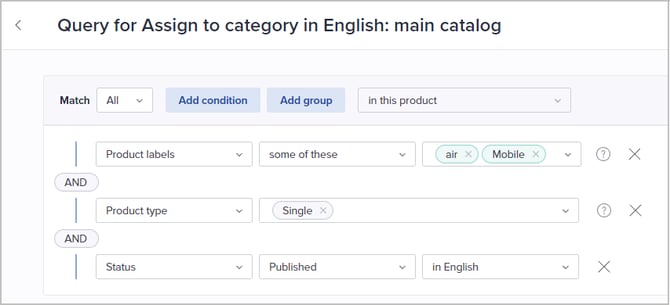
Tip! Please see Filtering using the query builder for details about how to build a query.
- Click Apply to save the query.
Tip! Once the query is saved, the number of products matching the query is presented in the Products section.
- In the Triggers section, specify which events that will cause the rule to be evaluated for a product.
Note! By default, Generate triggers from query is selected. This results in elements used in the query being added as triggers.
Alternatively, turn off automatically generating triggers to specify events manually instead. Please see Create trigger events for further details. - Click Save when you are done.
Change product status
By creating a rule for automatically changing product status, you can make sure that your products are published/unpublished as soon as possible as a result of other data being added, updated or removed in Bluestone PIM.
Note: The feature needs to be activated for your organization. Contact your system administrator if you need to request it.
Do the following to create a rule for automatically changing the product status:
- Select Change product status as Action.
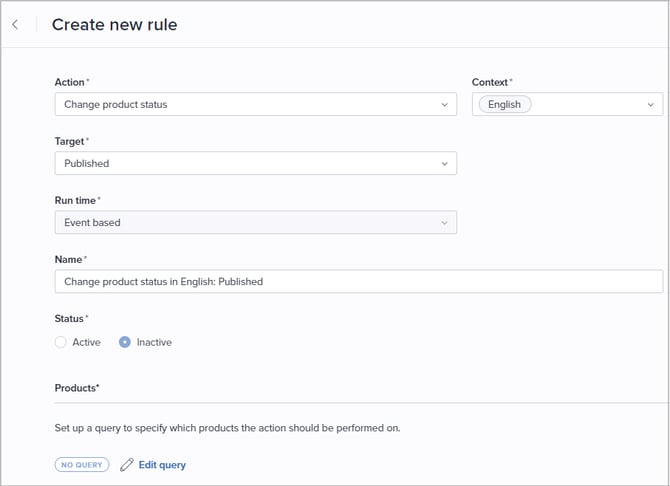
- Select the relevant Context(s).
- Select the relevant Target status. This is the status that will be set for products matching the query.
- Run time will be set to Event based. This means that the rule will be evaluated for a product when the given event(s) occur (ref. Create trigger events).
- Specify a Name for the rule.
- Set Status of the rule to Active if it should be executed immediately after saving it. You can leave it Inactive and activate it directly from the grid at a later stage, please see Actions.
- Click Edit query in the Products section to define conditions for products to be handled by the rule:
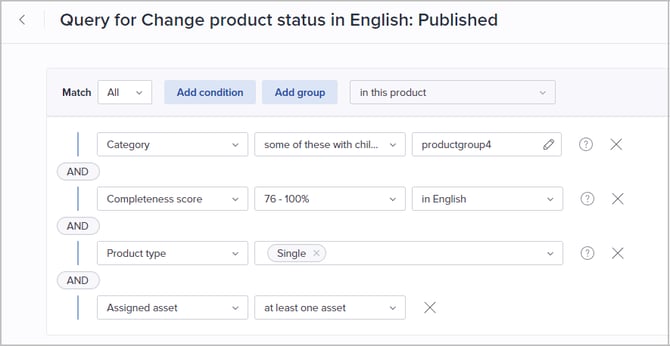
Tip! Please see Filtering using the query builder for details about how to build a query.
- Click Apply to save the query.
Note: Once the query is saved, the number of products matching the query is presented in the Products section, and the number of products not matching is presented in the Additional action section.
- Select Change status to Draft/Published if the query conditions do not match in the Additional action section if you want products not matching the query to be set to the status not selected as Target.

- In the Triggers section, specify which events that will cause the rule to be evaluated for a product.
Note! By default, Generate triggers from query is selected. This results in elements used in the query being added as triggers.
Alternatively, turn off automatically generating triggers to specify events manually instead. Please see Create trigger events for further details. - Click Save when you are done.
Tip! A rule for automatically changing status is normally set up together with a rule for automatically syncing products to PAPI. Please refer to the Sync products rule.
Edit attribute value
By creating a rule for automatically editing attribute values, you can make sure that your product information is up to date as a result of other data being added, updated or removed in Bluestone PIM.
Do the following to create a rule for automatically editing a product attribute value:
- Select Edit attribute value as Action.
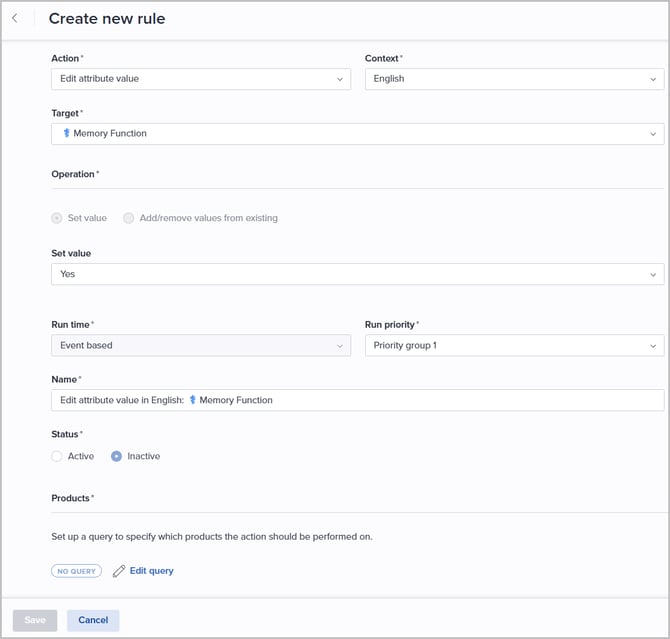
- Select the relevant Context.
- Select the relevant attribute as Target. This is the attribute that will be updated.
Note! If a product handled by the rule does not have the attribute assigned already, it will be added.
Tip! If you don't want the attribute to be assigned to products, add a condition for '<attribute> is assigned to product' to the query.
- Select which Operation to be performed:
- Set value
Will replace the current attribute value for all selected products where the attribute is assigned. It can also be used to empty any existing values.
Depending on the attribute type, select one/more pre-defined values or type a text. - Add/remove values from existing
Only applicable for multi-select and dictionary attributes. Allows you to add more select values to, or remove some values from the currently selected set of values: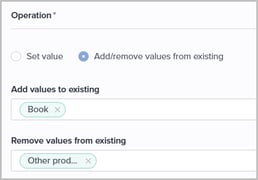
- Set value
- Run time will be set to Event based. This means that the rule will be evaluated for a product when the given event(s) occur (ref. Create trigger events).
- Set relevant Run priority. This will determine when the rule will be executed. Rules in 'Priority group 1' will be run first, then the rules in 'Priority group 2' etc.
- Specify a Name for the rule.
- Set Status of the rule to Active if it should be executed immediately after saving it. You can leave it Inactive and activate it directly from the grid at a later stage, please see Actions.
- Click Edit query in the Products section to define conditions for products to be handled by the rule:
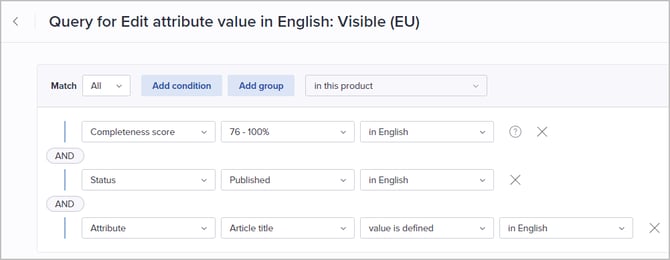
Tip! Please see Filtering using the query builder for details about how to build a query.
- Click Apply to save the query.
Tip! Once the query is saved, the number of products matching the query is presented in the Products section.
- In the Triggers section, specify which events that will cause the rule to be evaluated for a product.
Note! By default, Generate triggers from query is selected. This results in elements used in the query being added as triggers.
Alternatively, turn off automatically generating triggers to specify events manually instead. Please see Create trigger events for further details. - Click Save when you are done.
Generate PDF
Automatic generation of PDF documents allows you to make sure that your product documents (e.g. data sheets) are updated once product data is updated in Bluestone PIM.
Note: This feature will be available if the Product PDF plugin is activated for your organization. Contact your system administrator if you need to request it.
A new version of a specific PDF document will replace the current version. All PDFs generated for a product are available from the product's Assets tab. Each PDF document will be labeled with the template's name.
Do the following to create a rule for generating PDFs:
- Select Generate PDF as Action.
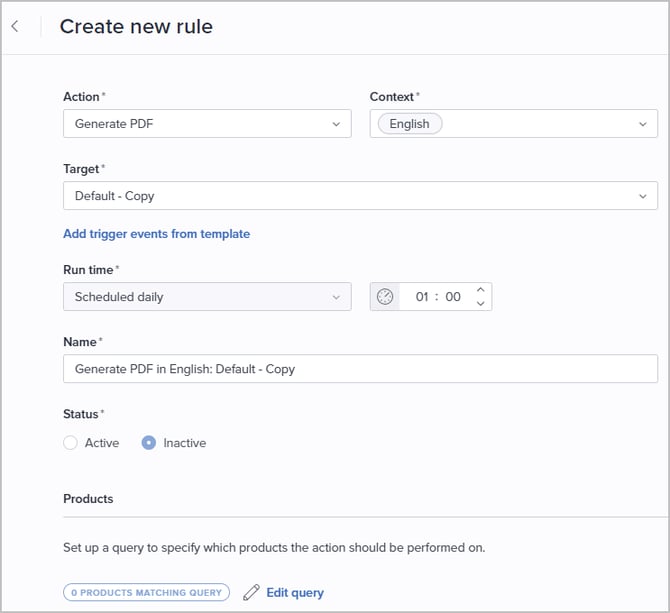
- Select the relevant Context(s).
- Select the relevant template as Target. This is the template that will be used for generating the PDFs. There can only be one rule per template.
- Optionally click Add trigger events from template, to automatically add triggers based on elements used in the template.
- Run time will be set to Scheduled daily. Specify the time of day you want the rule to be evaluated for a product after the given event(s) occur (ref. Create trigger events).
- Specify a Name for the rule.
- Set Status of the rule to Active if it should be executed immediately after saving it. You can leave it Inactive and activate it directly from the grid at a later stage, please see Actions.
- Click Edit query in the Products section to define conditions for products to be handled by the rule:
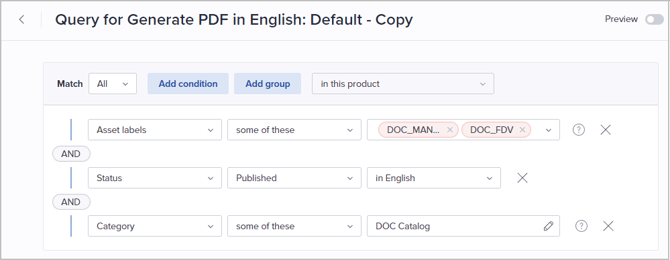
Tip! Please see Filtering using the query builder for details about how to build a query.
- Click Apply to save the query.
Tip! Once the query is saved, the number of products matching the query is presented in the Products section.
- In the Triggers section, specify which events that will cause the rule to be evaluated for a product.
Note! If you have selected Add trigger events from template, elements used in the template are added as triggers. These should be considered as suggestions and optionally edited/removed. You can specify events manually in addition. Please see Create trigger events for further details.
- Click Save when you are done.
Sync products
By creating a rule for automatically syncing products to PAPI, you can make sure that your products are published/updated/unpublished as soon as possible as a result of other data being added, updated or removed in Bluestone PIM.
Note: The feature needs to be activated for your organization. Contact your system administrator if you need to request it.
Do the following to create a rule for automatically syncing product information to PAPI:
- Select Sync products as Action.
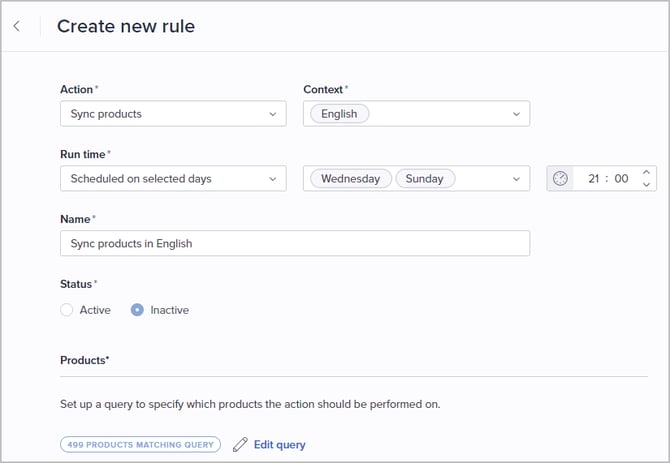
- Select the relevant Context(s).
- Select Run time:
- Event based: The rule will be evaluated for a product when the given event(s) occur (ref. Create trigger events).
- Scheduled hourly: The rule will be run every hour.
- Scheduled on selected days: Specify on which days and time of day to run the rule.
- Specify a Name for the rule.
- Set Status of the rule to Active if it should be executed immediately after saving it. You can leave it Inactive and activate it directly from the grid at a later stage, please see Actions.
- Click Edit query in the Products section to define conditions for products to be handled by the rule:
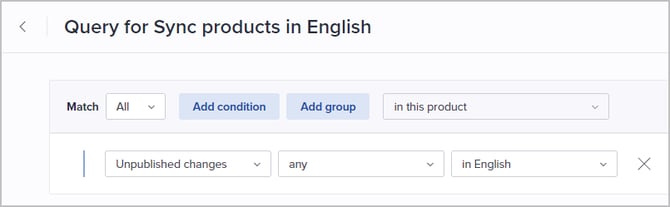
Tip! Please see Filtering using the query builder for details about how to build a query.
- Click Apply to save the query.
Tip! Once the query is saved, the number of products matching the query is presented in the Products section.
- If you have selected Event based run time, specify which events will cause the rule to be evaluated for a product in the Triggers section.
Note! By default, Generate triggers from query is selected. This results in elements used in the query being added as triggers.
Alternatively, turn off automatically generating triggers to specify events manually instead. Please see Create trigger events for further details. - Click Save when you are done.
Create trigger events
Different events can be used to make a rule being evaluated for a product. Most rules require at least one trigger to be defined.
The system will by default try to generate triggers automatically based on elements used in the connected query. For 'Generate PDF' rules, elements used in the PDF template will be added as triggers when Add trigger events from template is selected.
But you can turn off the Generate triggers from query option and specify relevant events manually instead.

Do the following to manually create a trigger:
- Turn off the Generate triggers from query option.
- Click the plus icon (Add new trigger) to the right in the Triggers section.
- Select the relevant entity in the first dropdown. The rule can be evaluated for a product when there is a change regarding one/more of these entities. Choices will vary depending on the selected Action.
- Asset with labels ('Generate PDF' action only)
When the value changes for a product having an asset with the selected label. - Attribute
When the value of the selected attribute changes for the product. - Attribute group ('Generate PDF' action only)
When the value of an attribute in the selected group changes for the product. - Category
When a category is assigned to or unassigned from the product. - Product
When the product is created or the product description, name, number, label or status changes. - Completeness
When the product's completeness score changes.
- Asset with labels ('Generate PDF' action only)
- For the Attribute entity, select the relevant attribute.
- Select the relevant event type. Choices will vary depending on the selected entity.
- For the Asset with labels and Attribute group entities, select whether the event source should be the 'Product that triggered event', 'Variant group of product that triggered event' or 'Variant of product that triggered event'.