Import product information
Swiftly create new or update products
You must be given explicit permission to create new products and update existing products via import.
Managed roles having access: System admin, PIM admin and PIM write.
Import summary Save mapping Manage import mappings
Overview
Import supports creating and updating product information such as attributes, assets, relations, categories, variants, and bundles.
Select Import from the main navigation bar. Already executed jobs are listed with the following main information:
You can sort the list ascending/descending by Start date or End date.
Import job operations
For each import job there are some operations available. Hover the relevant entry and click the 3-dots menu on the right-hand side to access:
- Details
View details about the import job, like who executed the job and how many rows were processed. - Download file
Download the original import file locally. - Save mapping
Save the mapping used in an import job for future imports. Please see Save mapping for details. - Delete session
Clean up historical import session information that is no longer needed.
Upload import file
Do the following to start an import job:
- Click the Import button in the upper right corner.

The following page is presented:
- Click the upload area at the top to select your CSV or XLSX file, or drag-n-drop your file into this area.
File limitation: Maximum 100 000 records (products), 500 columns (attributes, relations, categories, assets, etc.), 500MB (file size).
- Select which Context (language) to import data for.
- Optionally, if there is a saved mapping available, select the relevant Mapping from the dropdown.
Tip! Save time on repetitive imports by using saved mappings. Please see Save mapping for details on how to create.
- In the Syntax section;
- Optionally, select a default Value separator for all columns.
- Optionally, select a specific Encoding.
- Optionally, select how to detect any Header rows in your import file.
- Auto-detect: Let the import service suggest which row(s) to use.
- Headerless: If your data doesn't contain any headers.
- 1st row as header: If the first row contains headers.
- Custom: Specify how many rows contain header data.
- In the Creation of new entities section;
- Select Allow creating new attribute definitions if you want to allow any non-existing attribute definitions to be created during import. If allowing, you can still decide per attribute in the mapping page.
- Select Allow creating attribute definition values if you want to allow any non-existing attribute definition values to be created during import. Applies to single-select, multi-select and dictionary attribute types. If allowing, you can still decide per attribute in the mapping page.
- Select Allow creating new categories if you want any non-existing catalogs/categories to be created during import.
- Click Map data to continue.
- Before mapping can be done, you need to confirm that you understand the potential risk of importing product information:
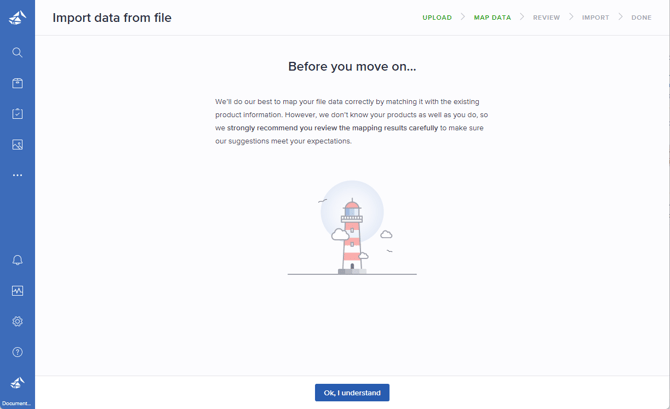
Warning! Import is a powerful tool that can potentially corrupt your data. Please carefully review the mapping, as the automatic mapping feature provides suggestions but has certain limitations.
- Click Ok, I understand to continue.
The mapping table is presented. Please see the next section for details.
Map data
When uploading a file, the contents are analyzed. Based on header data matching, the system suggests which data from the import file to be mapped to product metadata (Number, Name and Description), attributes and more.
A mapping is suggested if the column header in your file matches an already existing attribute name or product metadata field. If the column header is unknown, the system will suggest creating a new attribute. It also tries to detect the attribute type by analyzing the data format.
- If relevant, you can select a saved Mapping and switch to another Context at the top:

- If the import detects missing information, details can be found by clicking the Errors pill in the header:
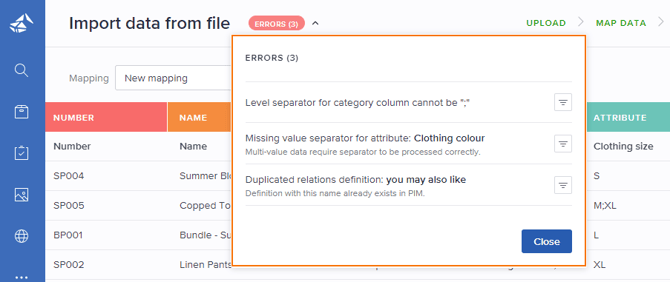
Optionally, click the Filter button for each error entry to view only the relevant column. This will help you easily locate the relevant column.
Data mapping column types
This section describes the supported data fields for import. These are represented as different column types in the mapping table.
- You can hover over each column header and click the pencil icon (Edit) to check and change the mapping if needed.
- You can hover over each column header and select/deselect the checkbox to include/exclude it from the import (Included in import).

- Number - Mandatory field used for looking up product numbers in PIM. Based on the result, products are either created or updated during the import.
- Name - If you want to add/update the product name, the product name column from your import file must be mapped to this column type.
- Description - If you want to add/update the product description, the product description column from your import file must be mapped to this column type.
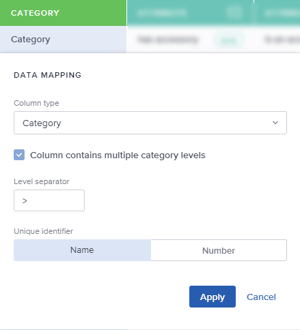
- Category - If you want to add/update which categories the product is linked to, the category column from your import file must be mapped to this column type.
-
- Select Column contains multiple category levels if your data contains category paths.
- If your data contains category paths, specify the character used as Level separator.
Note: Several categories must be separated by a semicolon (;).
- Select whether your import data uses Name or Number as Unique identifier for categories.
Note: If you want to create any categories not already found in PIM, the Allow creating new categories option in the Upload step must be selected.
- Attribute - If you want to add/update product attributes, the attribute column(s) from your import file must be mapped to this column type.
Note! When importing an updated attribute value for a Variant group having propagation activated, the value (VLA) will be inherited by the variants. This corresponds to the logic when performing bulk edits.
- If the correct attribute is not detected, select the relevant attribute group from the dropdown list and navigate to the relevant attribute definition, or use the search function to find it.
- If relevant, specify the Value separator. Applicable for multi-select and dictionary attribute types.
- If relevant, select Create new to create a new attribute definition in PIM. Select the Attribute type and if relevant, the Value separator. Then specify the Attribute name and, if relevant, the Unit.
- Bundle - Applicable for updating/creating a new bundle. Allows you to link one/more single-type products to the bundle. Specify the Product separator in the column's data mapping when linking multiple products.
Note! If bundle products are specified for a single-type product, it will be converted to a bundle.
- Variant - Applicable for updating/creating a new variant group. Allows you to link new/existing single products as variants to a new/existing variant group. The single-type products will be converted to variants. Specify the Product separator in the column's data mapping when linking multiple products.
Note! If variants are specified for a single-type product, it will be converted to a variant group.
Example:
An import scenario for creating/updating a variant group and connecting 3 new/existing products as variants.
1) The following file is prepared for import. The file will be read from top to bottom, so the products to be contained in the group must be listed first. The last entry will link the variants to the group by referring to the product numbers in the Variant column:
2) The file is uploaded in a new import session. When the data has been analyzed, the same order is reflected in the mapping table: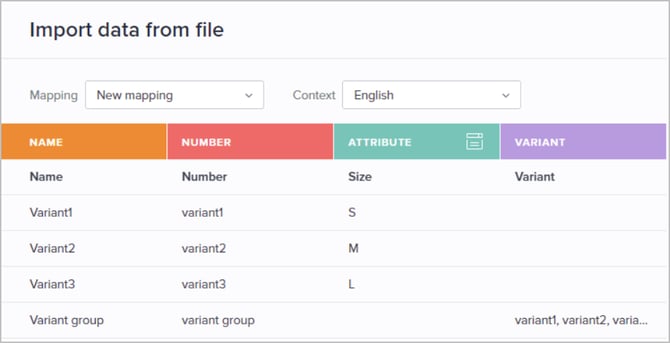
3) The 'Product separator' is verified/specified in the data mapping for the Variant column. In our example, a comma is used: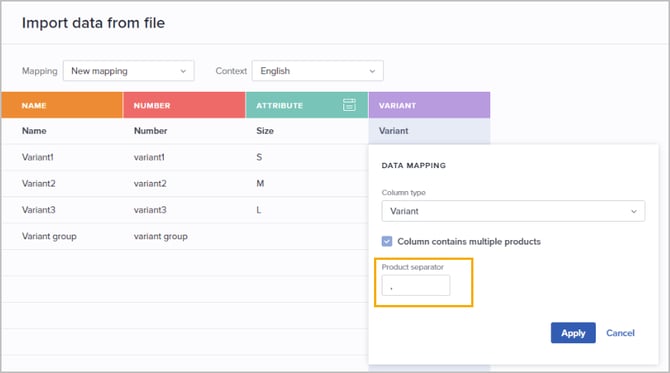
4) The import job initially updates/creates all products. Then, when processing the Variant column for the last product, the product is converted to a group and the first 3 products are connected as variants.
- Assets - Mapped to one/more assets by the original file name.
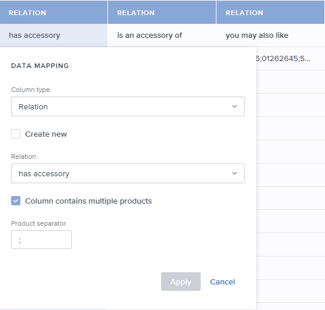
- Relation - Mapped to an existing one-way or two-way relation, or a new one-way relation.
-
- Optionally, select Create new and enter a relation name to create a new one-way relation.
- Select Column contains multiple products if there are multiple products to be linked using this relation.
- If Column contains multiple products is selected, specify the character used as Product separator (by default semicolon is used).
Note: When importing information for a two-way relation, a column for each direction is required.
When you have configured the mapping, go to the next step by clicking Review. Please see the next section for details.
Review
The review step gives an overview of data to be imported. Make sure everything looks correct before starting the actual import:
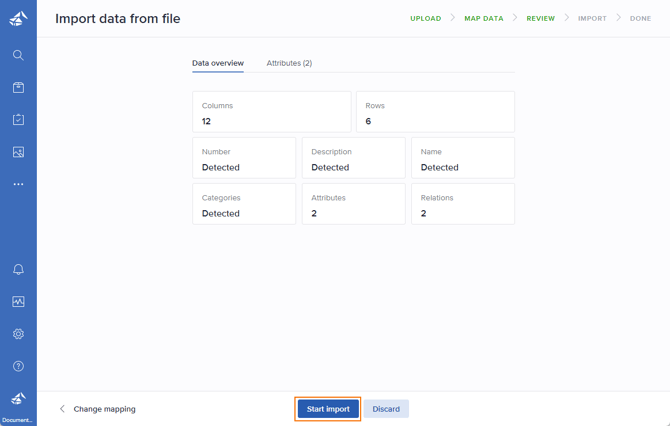
The review page is divided into two sections:
- Data overview
Summarized information about detected entities. - Attributes
Information about the number of attributes per type found in the import file.
Click Change mapping to go back to make adjustments. Click Discard to cancel the import operation.
When you have made sure everything is correct, click Start import.
Import summary
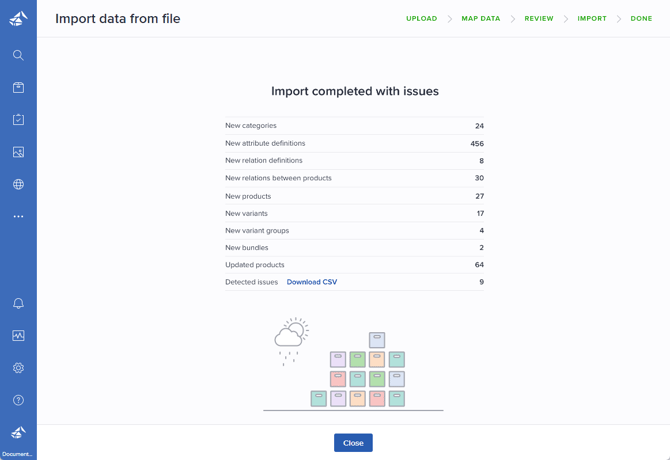
When the import is finished, a summary of what has been imported is presented:
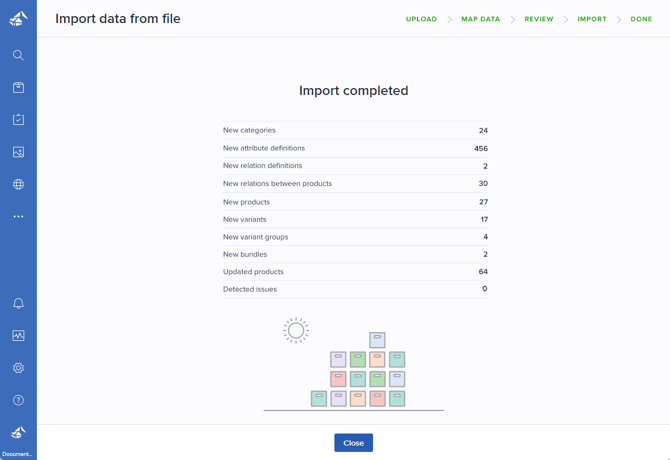
If there are some issues detected during the import, relevant records can be viewed by clicking Download CSV or Download XLSX, depending on the format of the import file:
Tip! Please see Export product information for details on how to perform an export of product information.
Save mapping
After importing a file, you can choose to save the configured mapping, making it reusable for future imports of files with the same column structure.
Do the following:
- Open the Import module/page.
- Click the 3-dots menu to the right of the relevant import job.
- Select Save mapping:

Manage import mappings
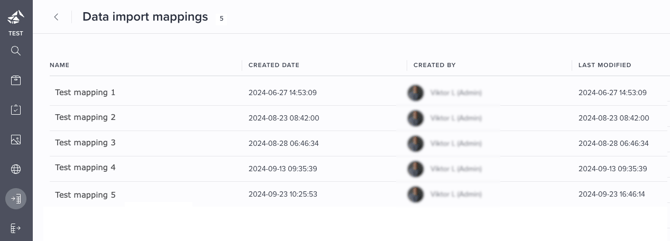
View the available mappings by clicking the Data import mappings button in the upper right corner:

The name, creation date, creator, and last modified date are presented for each mapping:
Duplicate a mapping
To duplicate a mapping, click the 3-dots menu on the right-hand side of the relevant mapping and select Duplicate. The new mapping will be named "[duplicated mapping's name] (duplicate)". Please see the next section on how to edit the name.
Edit the name of a mapping
To edit the name of a mapping, click the Name field in the grid, update the name, and press [Enter].
Delete a mapping
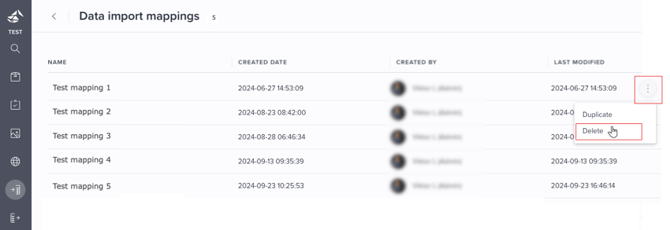
To remove a mapping, click the 3-dots menu on the right-hand side of the relevant mapping and select Delete:
![Bluestone_PIM_white_logo_RBB-3.png]](https://help.bluestonepim.com/hs-fs/hubfs/Bluestone_PIM_white_logo_RBB-3.png?height=50&name=Bluestone_PIM_white_logo_RBB-3.png)