Managed roles having access: System admin, PIM admin, PIM write, DAM write, PIM personalized, and Supplier. DAM read has read access only.
Overview
The Assets module provides a comprehensive overview of assets and is a powerful tool for efficient assets management.
Open the module by selecting Assets from the main navigation bar. The page is divided into 3 main parts:
-
The Filters and Views panel to the left.
-
The Assets grid in the middle.
-
And when an asset is selected, the Details panel to the right.

Asset filters
When working with large amounts of assets, using Filters is an efficient way of finding the asset(s) you are looking for. Filtering can be done based on asset information like Name, Asset type, Assigned products, Labels, and/or Attributes. Multiple criteria can be added to reduce the number of assets found.
Specify criteria
Do the following to add filter criteria:
- Click Filters in the left panel.
- The default filter setup includes Name, Original file name, Description, Asset type etc.
Tip! If you are given access you can configure which fields/options to be shown. See Filters setup on how to do this.
- Add relevant filtering criteria by e.g. adding text in the Name field and selecting two Asset types.
Filter criteria that you select will be applied immediately, and matching assets are presented in the grid:Note: For text filters, a minimum of 2 characters must be specified.

Tip! If you have applied a filter that can be useful at a later stage, you can save it as a View by clicking Save view and giving it a name. Saved views are available from Views. Please see Asset views for details.
Remove criteria
You can remove filter criteria one-by-one by clicking the 'x' in the relevant criterion's 'pill' above the grid.
You can remove all filter criteria in one go by clicking Clear all above the grid.
Filters setup
Optimize your workflow by tailoring the filter panel to your specific needs. Beyond personal preferences, administrators can extend these efficiencies by creating tailored setups for specific colleagues or establishing global defaults for the entire organization.
Tip! To find specific assets more efficiently, customize your filter panel by adding relevant attributes. This allows for more granular searches tailored to your data.
This configuration process is identical to the one used for Products. For step-by-step instructions, please refer to the Product filters setup documentation.

Asset views
When working with large amounts of assets, using Views is an efficient way of locating assets fulfilling a set of predefined criteria.
You might have access to public views and/or views shared with you by other users. When a view is selected, the connected filter criteria are presented above the grid:

Create an asset view
Do the following:
- Specify relevant filter criteria in the Filters panel.
- Click the Save view button in the upper left corner of the Filters/Views panel.
The following window is presented:
- Specify a Name.
- In the Sharing field; select whether the view should be private, shared with selected users or made public.
- If you selected to share it with other users, select relevant Users.
- Select Set as my default view if you want this view to open by default when accessing the Assets module.
- Click Save.
Your new view is now presented in the Views list. When selected, the assets matching the connected filter criteria are presented in the grid.
Rename an asset view
Do the following to rename a view you have created:
- Hover over the relevant view and click the 3-dots menu.
- Select Rename.
- Specify the new name in the pop-up.
- Click Save.
Update an asset view
If the filter criteria connected to a view are no longer correct for some reason, the view needs to be updated.
Note: You are not allowed to update views created by other users.
Do the following:
- Optionally load the relevant view.
- Update the filter criteria in the Filters panel.
- Click the Save view button in the upper left corner of the Filters/Views panel.
The following window is presented:
- Select Update existing.
- Select the relevant View to be updated.
- In the Sharing field; select whether the view should be private, shared with selected users or made public.
- If you selected to share it with other users, select relevant Users.
- Select Set as my default view if you want this view to open by default when accessing the Assets module.
- Click Save.
Your view has now been updated.
Change sharing settings for an assets view
Do the following to share an existing private view or make a shared view private:
- Hover over the relevant view and click the 3-dots menu.
- Select Share.
- In the Sharing settings window; select whether the view should be private, shared with selected users or made public.
- If you selected to share it with other users, select relevant Users.
- Click Save.
Delete an asset view
Do the following to delete a view you have created:
- Hover over the relevant view and click the 3-dots menu.
- Select Delete.
- Confirm removal by clicking Delete in the pop-up.
Assets grid

Tip! Please see Asset filters for information on how to specify filter criteria and configure your Filters setup. Please see Asset views for information on how to create a view containing filter criteria.
Sorting grid contents
By default, the grid displays assets without a specific sort order. Click the Sort by dropdown to select your preferred sorting criteria, such as 'Latest' or 'Name A-Z':

Asset actions

Asset bulk operations

Asset details panel
When clicking an asset from the grid, the details panel is opened on the right-hand side. See the following sections for details about each tab.
Details tab
The Details tab presents main information about the asset. Most of this information is not editable:

- Asset name: The given name of the asset.
- Description: A text describing the asset.
- Asset labels: Labels added to the asset.
Assign/unassign labels to/from the asset by clicking the field and selecting/deselecting labels in the dropdown. - Availability: The state of the asset:
- Public: Available for publishing in channels.
- Automatic: This is the default state when an asset is added to the DAM. The asset will be available for publishing in channels when a linked product is published.
- Internal: Only for internal use. Will never be published.
- File name: The original file name of the asset.
- File type: The type of asset. The different types supported are 'Image', 'Audio', 'Video', 'Document', 'Text' and 'Other'.
- File size: The size of this asset.
- Dimensions: The width and height of this asset in pixels.
- Added date: The date when the asset was uploaded to the DAM.
- Added by: The user who uploaded the asset to the DAM.
Attributes tab
The Attributes tab presents any attributes currently added to this asset. Attributes and their values are included when syncing information to the Public API (PAPI).
Tip! Please see Create, edit or remove attributes for information on how to create an attribute definition. The most common attribute types are supported for assets (compound, column and matrix are not supported).
Do the following to add an attribute to the asset:
- Click the plus icon (Add attribute):

- Find the relevant attribute by selecting an attribute group and/or searching by typing one/more characters:

- Click the relevant attribute.
Note: Maximum 10 attributes can be added to each asset.
Products tab
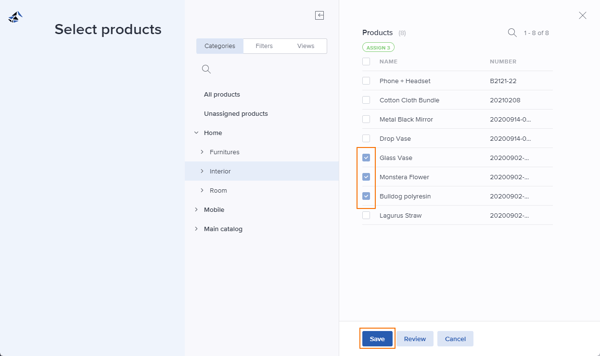
The Products tab presents any products currently linked to this asset. You can click the arrow button above the table to List all products in the grid.
Do the following to link the asset to a product:
- Click the plus icon (Add to product):

-
The Select products page is presented. Assign and/or unassign products by selecting/deselecting. To find relevant products more easily, you can utilize Categories, Filters, Views and the search function:
-
Optionally click Review to get an overview of your selections before moving on with the operation.
-
Click Save to assign and/or unassign products according to your selection.
Categories tab
The Categories tab displays all catalogs and categories the asset is currently assigned to. Assets can be assigned to one or more catalogs or categories to provide supplementary information at the catalog or category level.
Use the view type button (Change view type) above the table to switch between Compact and Comfortable view.
Do the following to assign the asset to a catalog/category:
- Click the pencil icon (Edit categories).

- The Add asset to categories page is presented. Link and/or unlink catalogs/categories by selecting/deselecting:

- Click Save changes when you are done.
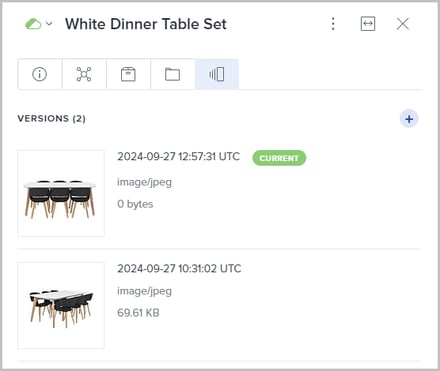
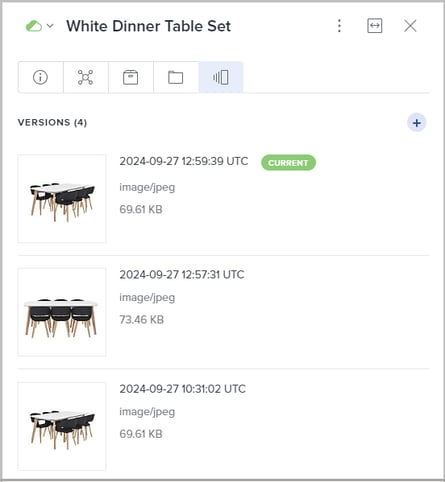
Versions tab
All versions of the asset are listed in this tab. The current version is marked with a green label.
Do the following to add a new version:
- Click the plus icon (Add new version).

- The Add new version of asset window is presented. You can add a file in two ways:
- Click Select file to browse file locations to find the relevant asset.
- Drag-n-drop the relevant file into the marked area.

Note: The maximum file size is 128 MB.
- Click Ok when you are done.
Download asset version

Restore asset version
To set a previous asset version to the current one, hover the relevant version and click the restore bin button:

AI Image Enhancer tab
ℹ️ Currently available in the Test environment ℹ️
We’re introducing AI-powered image enhancement directly in Bluestone PIM.
A new tab can be made available in the Asset's details panel, where users can prompt the AI - powered by Google’s Nano Banana - for improved visuals and editing support:

Interested in trying it out? Reach out to our support team to learn more: support@bluestonepim.com