Managed roles having access: System admin and PIM admin.
Create an attribute group Edit an attribute group Delete an attribute group
Create an attribute definition Create a workflow attribute definition (PPE)
Edit an attribute definition Delete an attribute definition
Overview
To access the attribute definitions, go to Settings in the main menu bar and select Attributes:

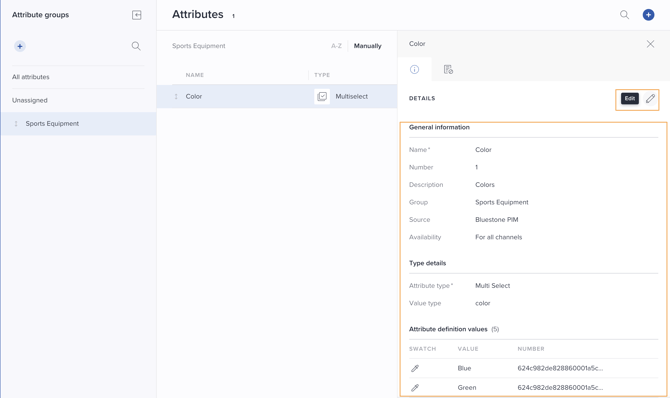
Attributes are organized into groups to streamline the management and data enrichment process. Use the left panel to select a specific group; the grid will update to display only the attributes assigned to that selection.
The grid provides a high-level overview of your attributes, including their Name, Number, and Group assignment.
Modify group assignments
You can link an attribute to a group - or reassign it - directly within the grid without opening individual records. Simply double-click the cell in the Group column for the relevant attribute and select the desired group from the dropdown:

Create an attribute group
Attribute groups are created for grouping attributes that logically belong together. Using groups will make management and enrichment easier when you have a large number of attributes.
If no attribute groups are created, all attributes will be added to the Unassigned group.
Do the following to create a group:
- Click the plus icon (Add group) in the left panel:

- Write a name and click the green check mark (Confirm):


Note: When removing a group having attributes assigned, the attributes will be moved to the Unassigned section.
Create an attribute definition
Perform the following steps to create a new attribute:
- Click the plus icon (Add attribute definition) in the upper right corner:

- The following page is presented:
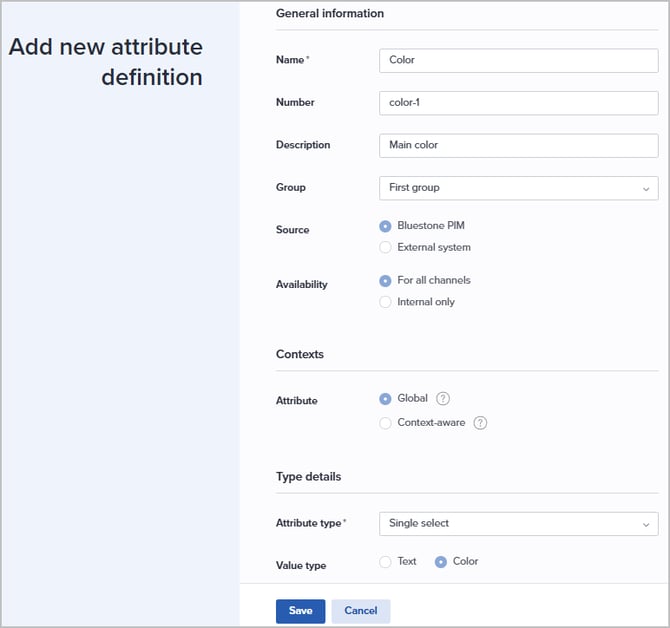
General information: - Specify the attribute Name.
- If required, specify a unique Number. If not specified, a number will be generated by the system.
- Add a Description of the attribute.
Tip! The Description will be presented as a tooltip when the attribute field is hovered during product enrichment, and can therefore be of great value to the user.
- Select which Group the new attribute should belong to.
Please see Create an attribute group for more information. - Select the Source of this information. Either this information is maintained in Bluestone PIM or an External system. In the latter case, attribute values will not be editable by users in Bluestone PIM.
- Select the Availability of this information. Either it should be available For all channels or Internal only. In the latter case, this information will not be synced to PAPI/published, and therefore a change in the attribute value for a published product will not flag the product with "Updates to be published".
Contexts: - Specify whether the attribute should be Global or Context-aware:
- Global attributes share the same value across all contexts. Editing the value in one context will automatically update it in all other contexts.
- Context-aware attributes can hold different values in different contexts. Editing the value in one context will not affect values in the others.
Type details: - Select the relevant Attribute type. Please see Attribute types for details.
We will be using 'Single select' in our example. - Depending on the attribute type, enter any required information.
For 'Single select', specify the Value type Text or Color.
We are using 'Color' in our example.
Definition values: - If you are creating a select attribute (Dictionary, Multiselect or Single select), add relevant values.
- Click Save when you are done.
Create a workflow attribute definition (PPE)
If your organization will be utilizing the Personalized Product Editor (PPE) with approval workflow, a specific system attribute definition must exist.
Tip! Please see How to configure and use PPE for usage details.
Follow the steps from the Create an attribute definition section and include the following details:
- Specify a Name like "Product content status" for easier recognition.
- Number must have value "ppe_flow".
- Optionally specify a Description like "Approval workflow steps".
- The attribute must belong to the "System attributes" Group.
- Select "Bluestone PIM" as Source.
- Availability should be "For all channels".
- The Attribute type must be "Single select".
- Value type is "Text".
- Add the following Definition values. The Values can be set according to your needs/preferences, but the Numbers must be exactly like stated:
Value Number Supplier update needed ppe_flow_input_needed Waiting for approval ppe_flow_waiting_for_approval Supplier content approved ppe_flow_approved Completed ppe_flow_complete
After saving the new definition, the attribute can be assigned to relevant products.
Edit an attribute definition
Important! Make sure that there will be no negative consequences before changing existing attribute values.
When you e.g. need to add a new definition value to a multi-select attribute, do the following:
- Find the relevant attribute definition e.g. by opening the relevant group from the left panel or by searching by clicking the magnifying glass (search) in the upper right corner.
- Click the relevant attribute from the grid to open the details panel.
- Click the Pencil icon (Edit).
The definition details are presented in a separate page. - Make the required changes.
- Click Save when you are done.
Warning! Deleting an attribute definition will result in the attribute being removed from any product it is assigned to. In addition, it will be removed from any column setups, views, mappings and completeness requirements.
When you need to remove an attribute definition, do the following:
- Find the relevant attribute definition e.g. by opening the relevant group from the left panel or by searching by clicking the magnifying glass (search) in the upper right corner.
- Hover the relevant attribute from the grid.
- Click the trashbin icon (Delete).
- Confirm removal by clicking Delete in the pop-up.