You must be given explicit access to set up PPE for users in your organization.
Managed role having access: System admin.
Users must be given the PIM personalized or Supplier role to access the PPE module.
The Personalized Product Editor, referred to as PPE, is a simplified interface for product management that can be tailored to meet your organization's specific needs. It allows you to customize the elements that your users will interact with when using PIM.
The product grid in PPE:
New! All product types can now be presented in the grid. The users can decide which type(s) to be shown if the 'Product type' filter option is included in their setup. See Filters for details.

Overview
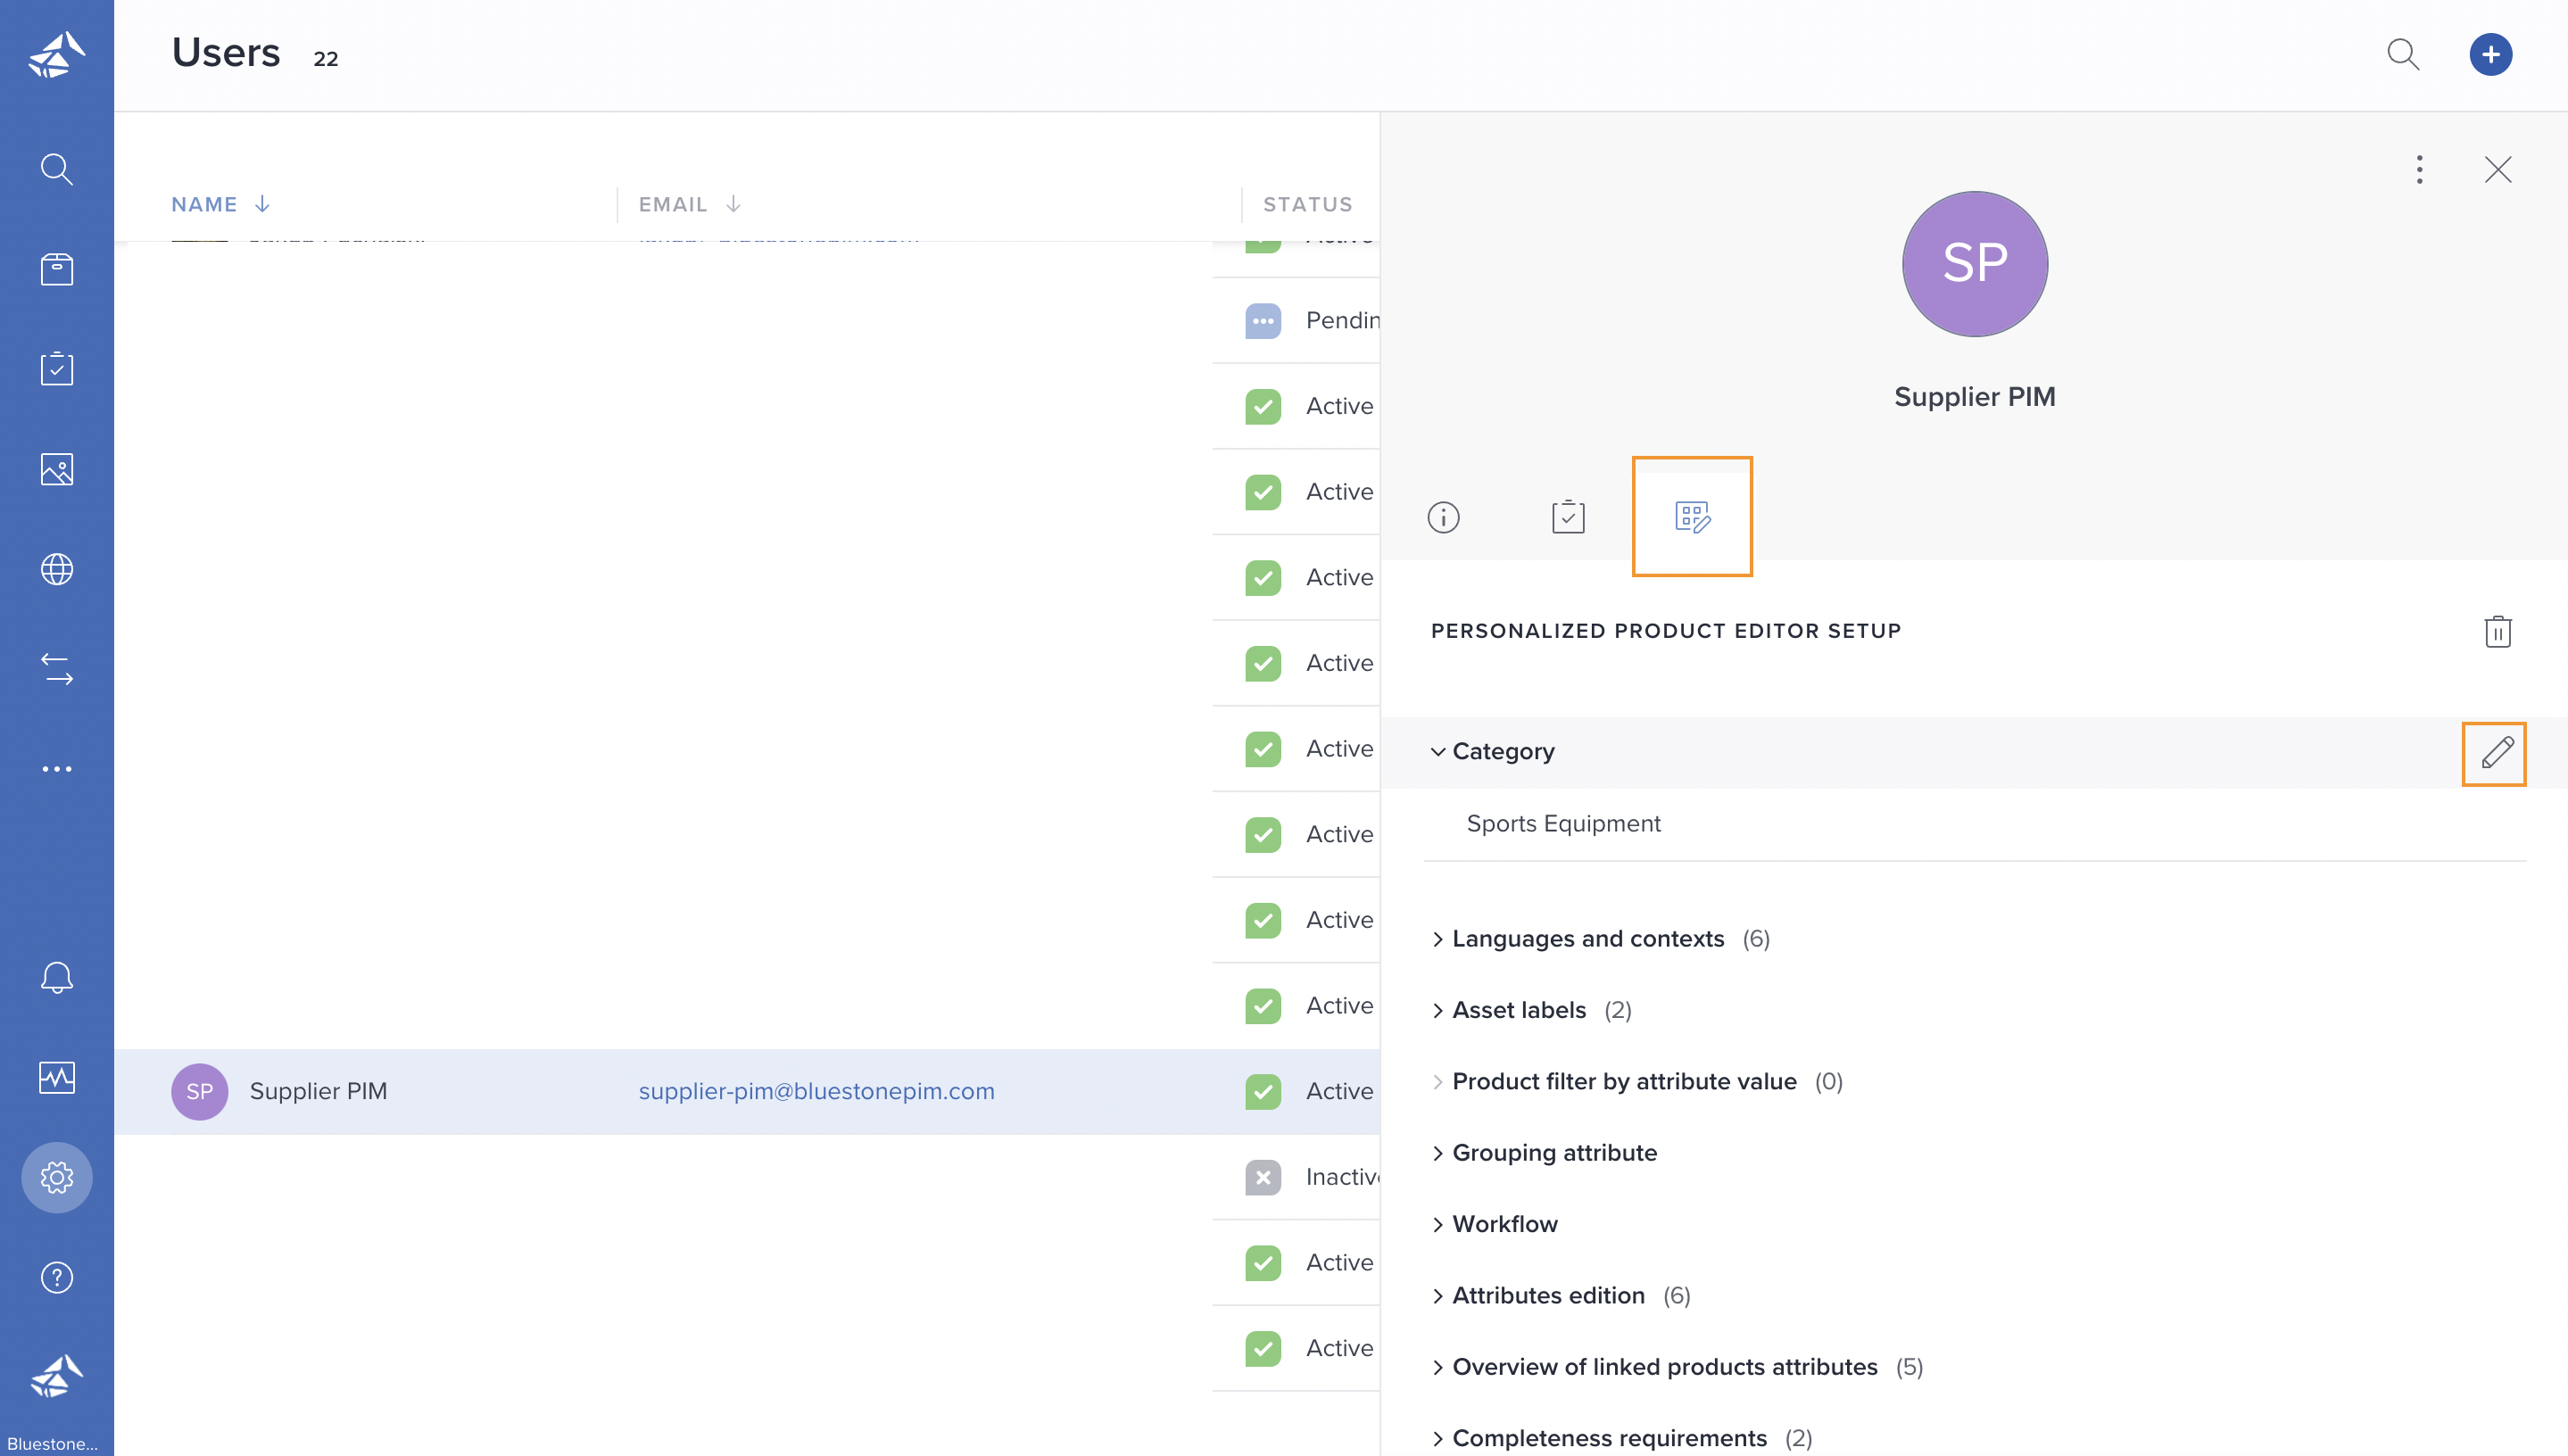
The PPE must be configured for each user, allowing for personalized access to products, attributes, assets, views and dashboards.
- Go to Settings and select Users.
- Select the user you want to configure PPE for. The details panel is opened.
- Go to the Personalized Product Editor Setup tab.
- You can either Configure the setup from scratch or Copy setup from another user (as basis). The latter will save you some time as there are many steps to go through.

The configuration consists of the following steps. Please follow the links to detailed descriptions when needed.
Note: Sections marked with an asterisk are mandatory.
Step 1: Access
- Category access*: Provides the user with access to a specific product category or catalog, including its subcategories.
- Languages and contexts*: Grants the user access to one or multiple languages or contexts.
- Asset access with labels*: Gives the user access only to assets with specific labels.
- Product access control with attributes: Gives the user access only to products having specific attribute value(s).
- Grouping variants by attribute*: Allows for using a specific attribute for grouping/filtering variants within the variant group page.
- Attributes edition*: Grants the user access to edit specific attributes.
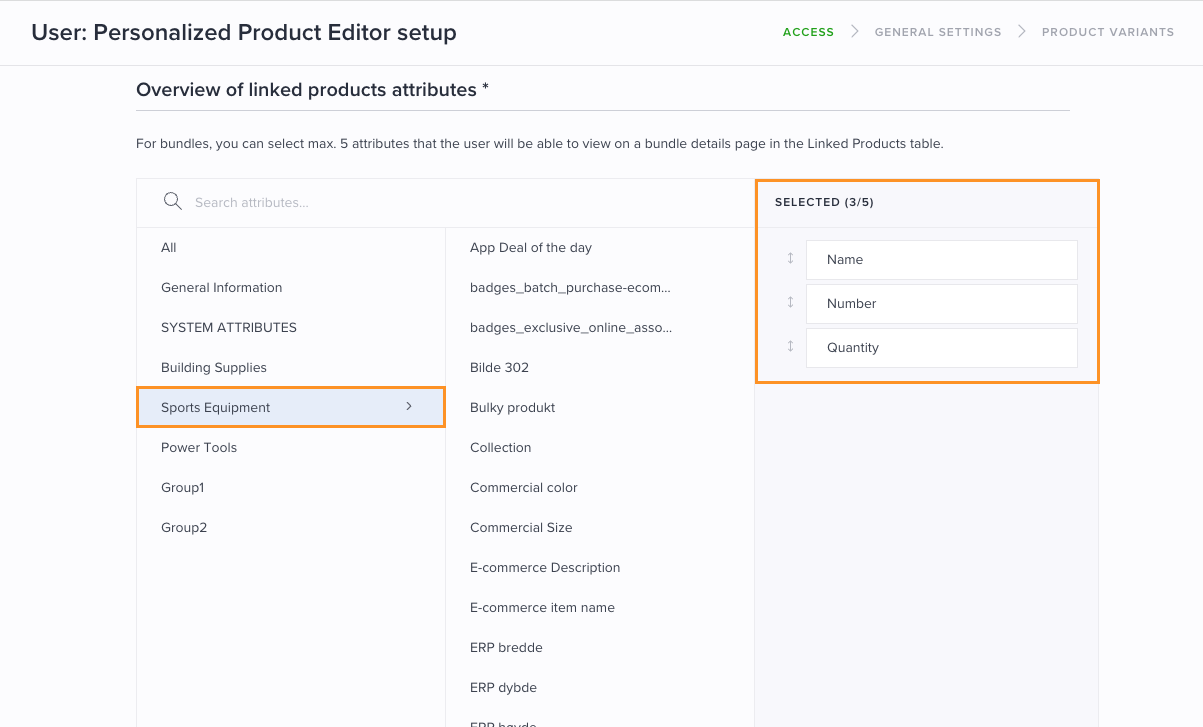
- Overview of linked products attributes*: Allows for specifying which attributes to be presented for products included in a bundle, within the bundle's page.
Step 2: General settings
- Workflow: Allows for controlling product updates by assigning a supervisor who will manage product access and approve changes made by the user.
- Completeness requirements: Allows for defining criteria for when a product is considered complete.
- Attributes on product thumbnail: For specifying which attributes to be presented on each product tile in the grid.
- Filters*: For specifying which attributes the user can utilize as filters.
Step 3: Variants
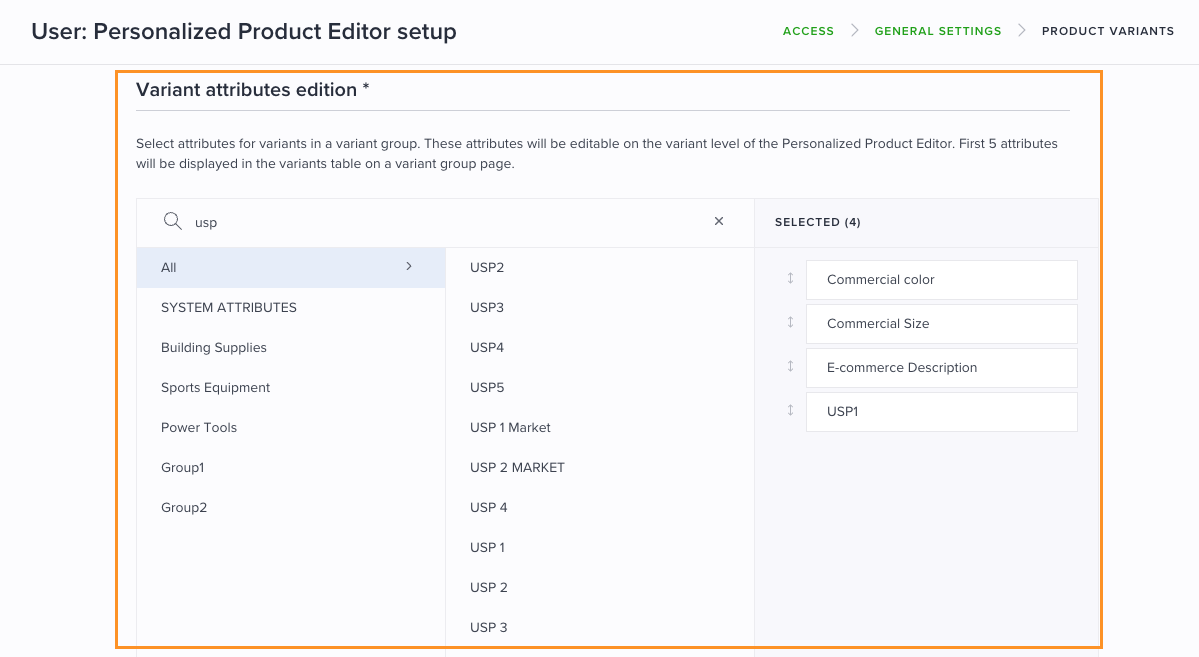
- Variant attributes edition*: For specifying which attributes the user can edit for variants.
- Variant-level attributes (VLA) propagation*: For deciding whether VLA values should be overwritten or kept on variants.
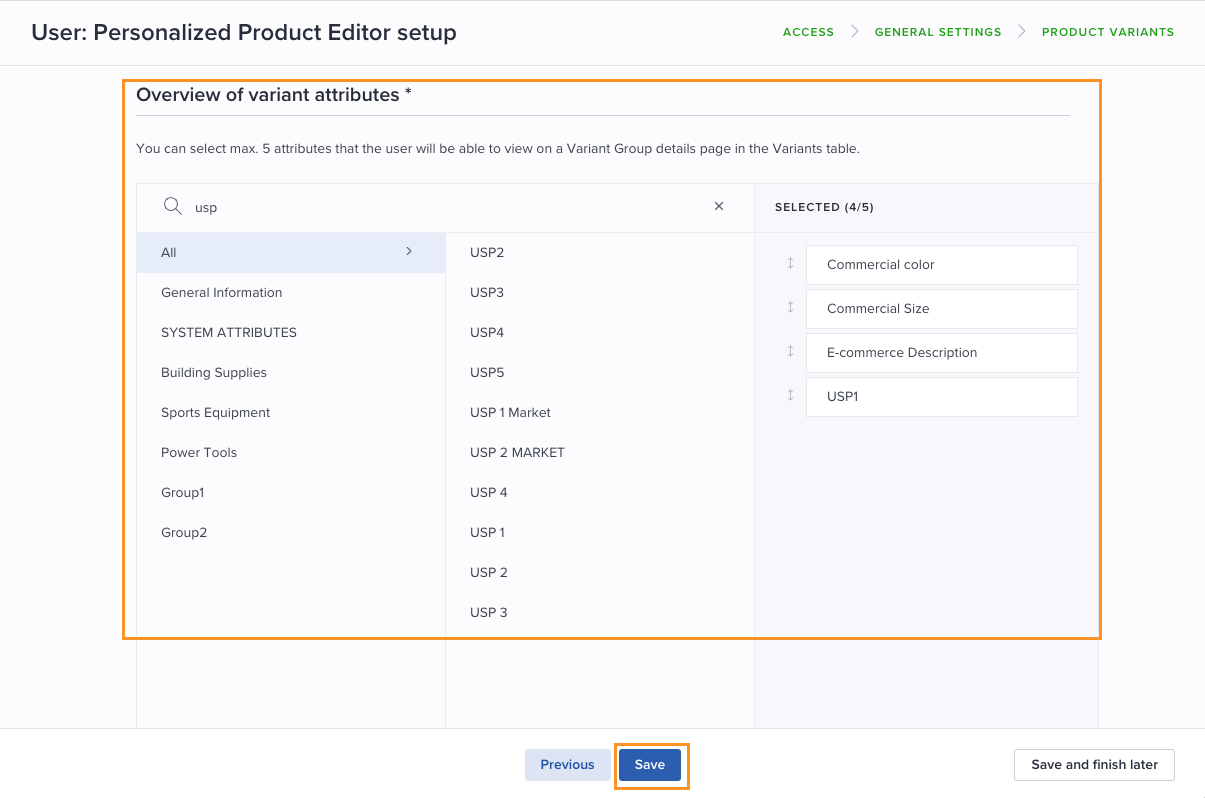
- Overview of variant attributes*: For specifying which attributes to be presented for the variants on the variant group page.
Tip! The process of setting up PPE for a user might take a while. Click Save and finish later in the lower right corner at any time to save current settings and resume configuration at a later stage.
Step 1: Access
Category access gives users access to one product category or catalog with subcategories.
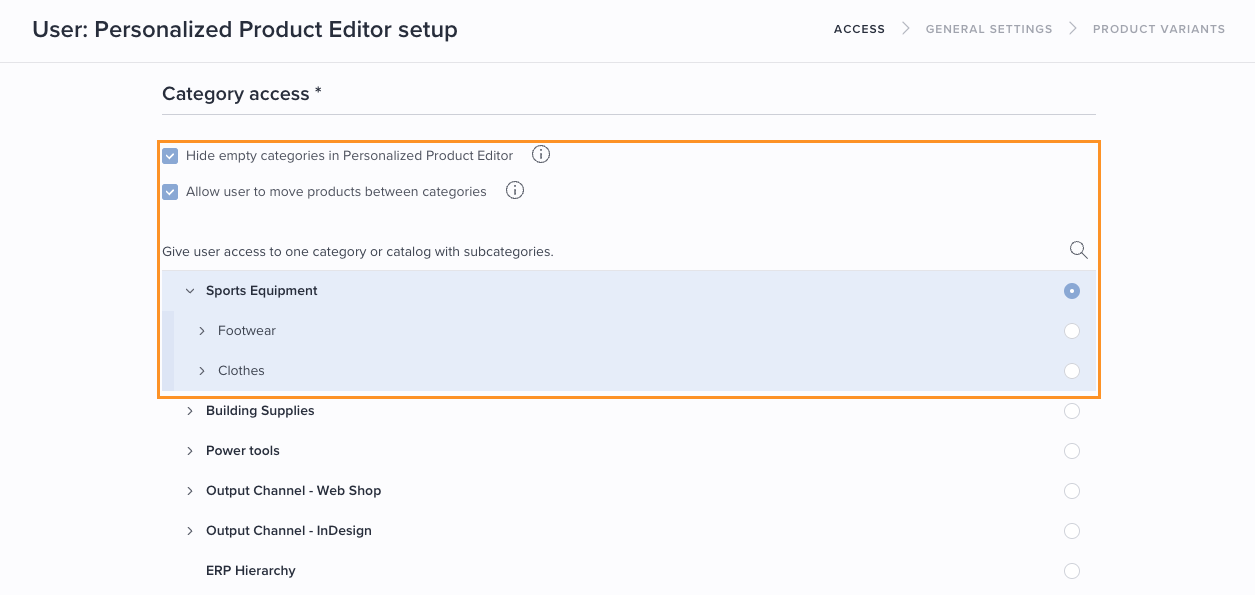
- Select whether empty categories should be hidden from the PPE user.
- Select whether the PPE user should be allowed to move products between categories.
- Select the catalog/category the PPE user should have access to.
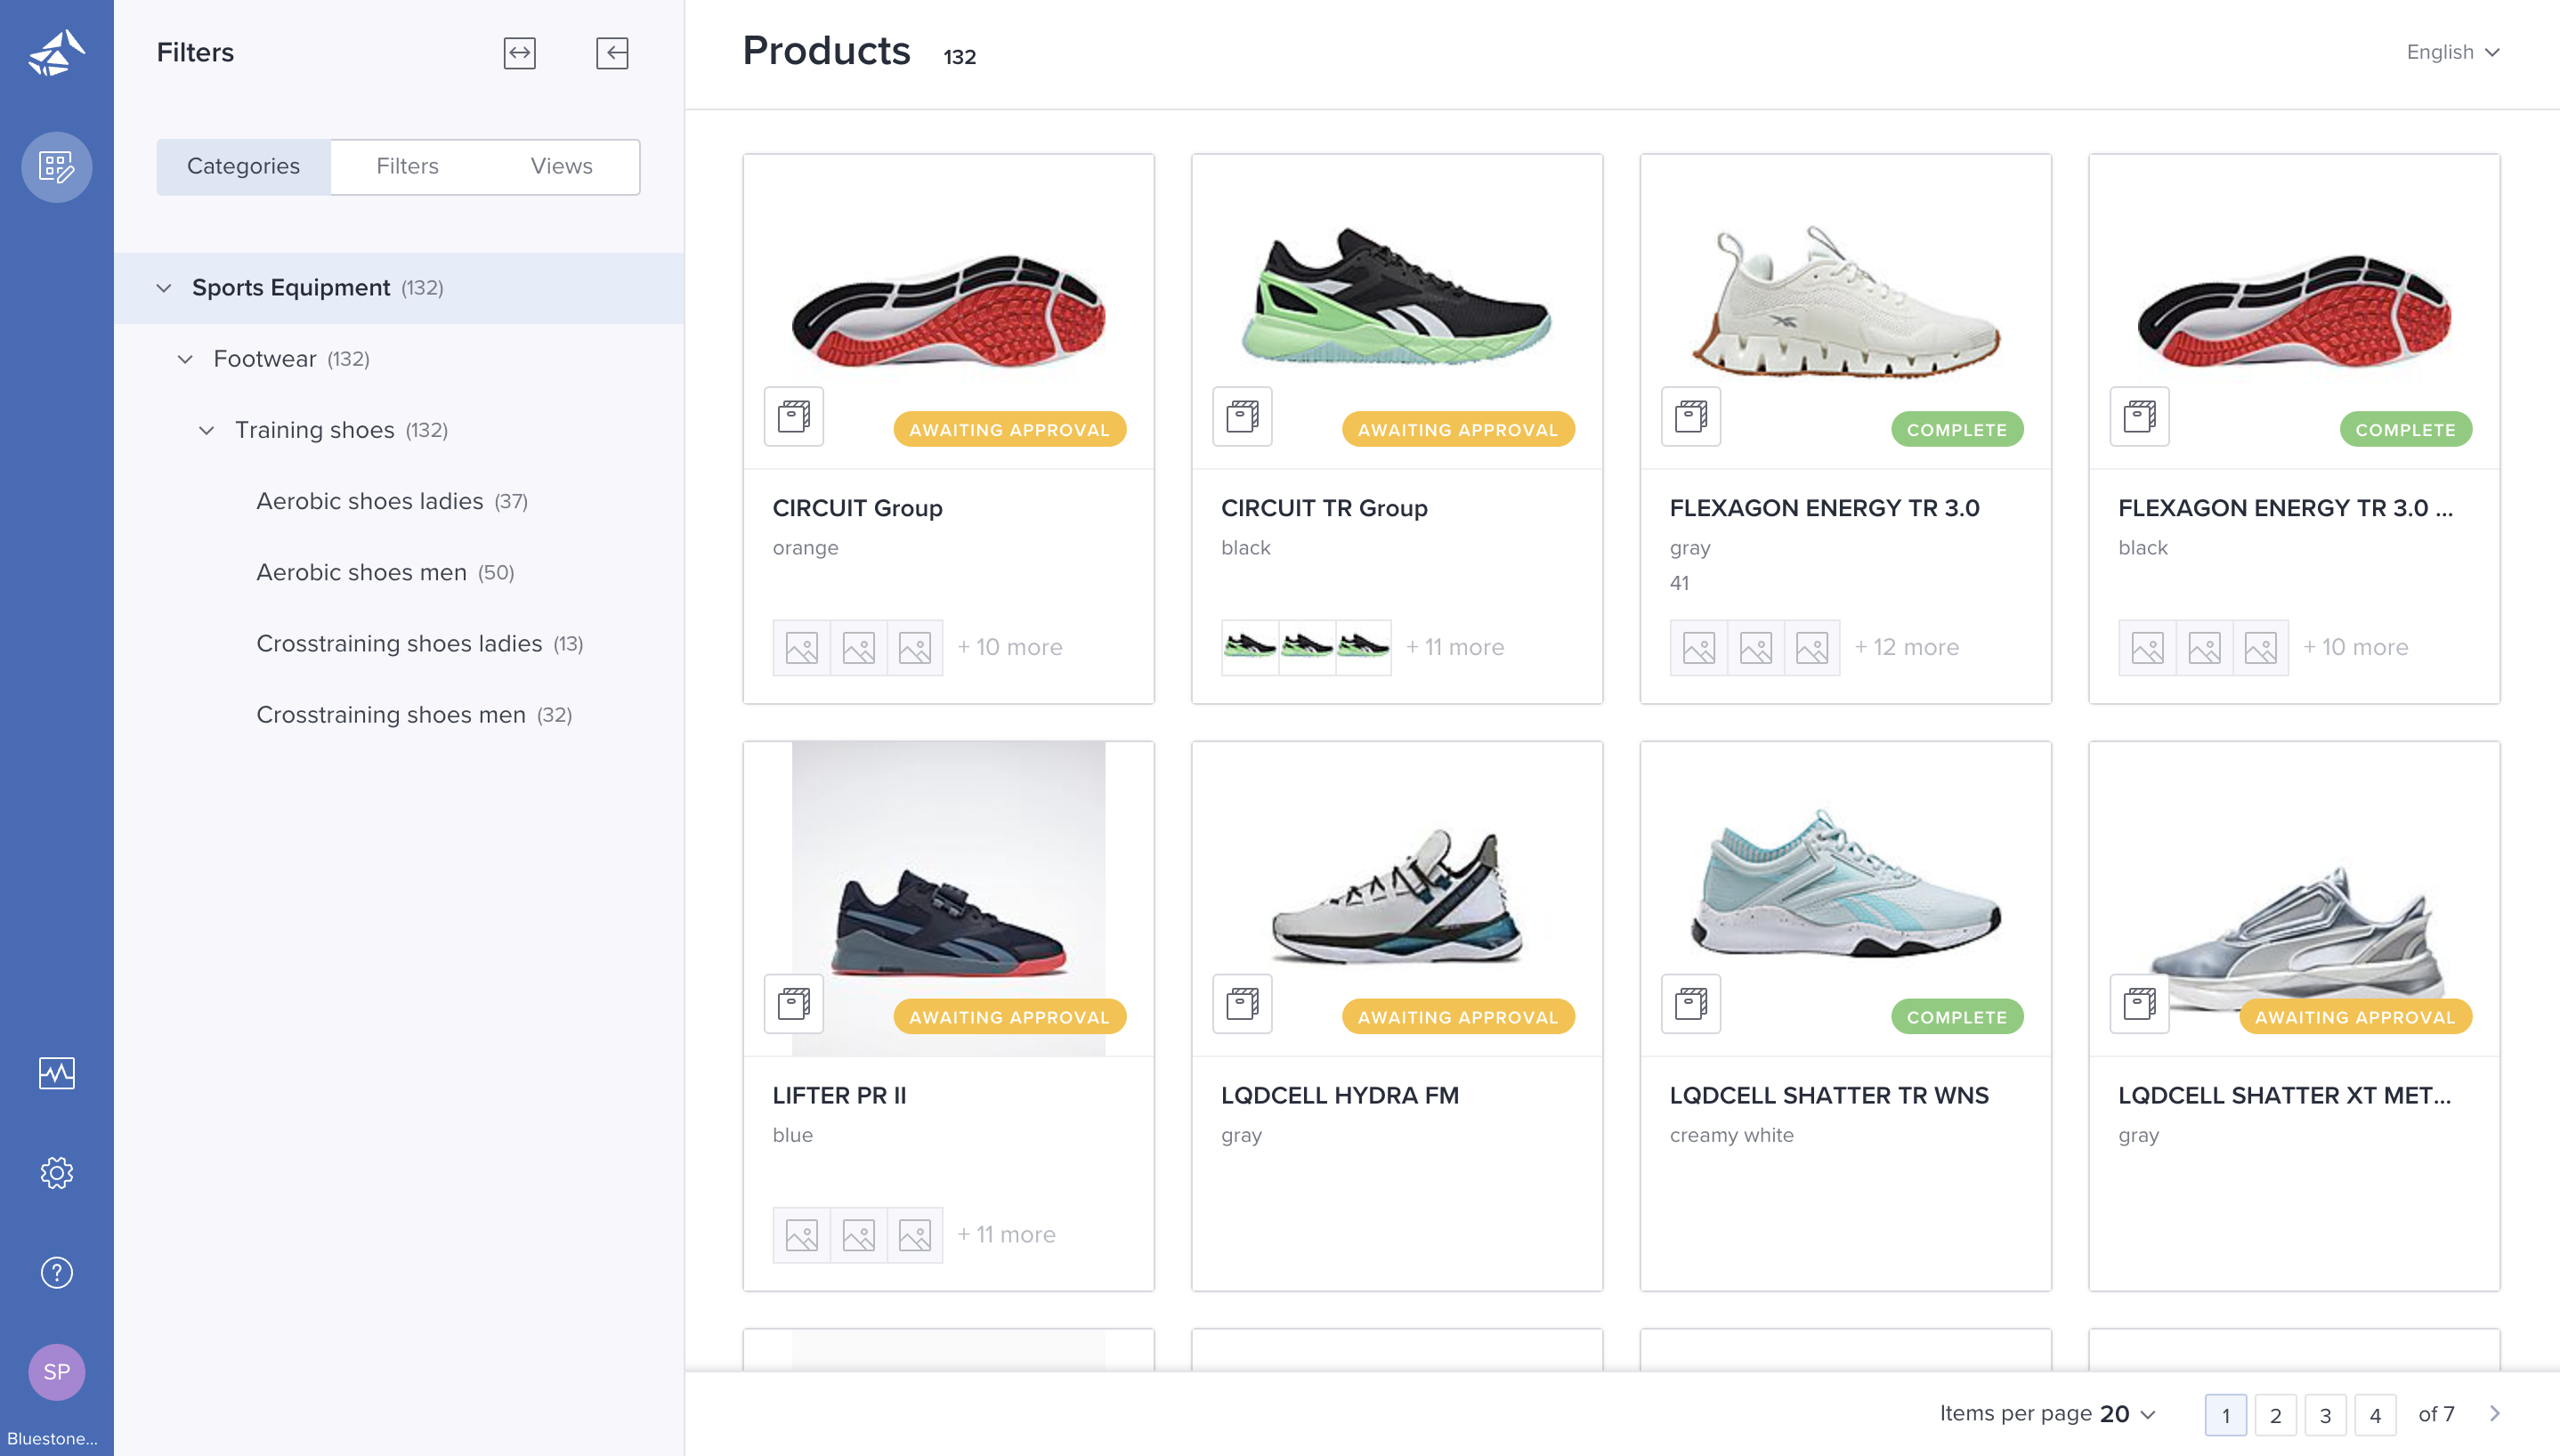
How category access is presented to the PPE user
The PPE user can only view products within the catalog/category he is given access to. The user can navigate by selecting specific categories/sub-categories: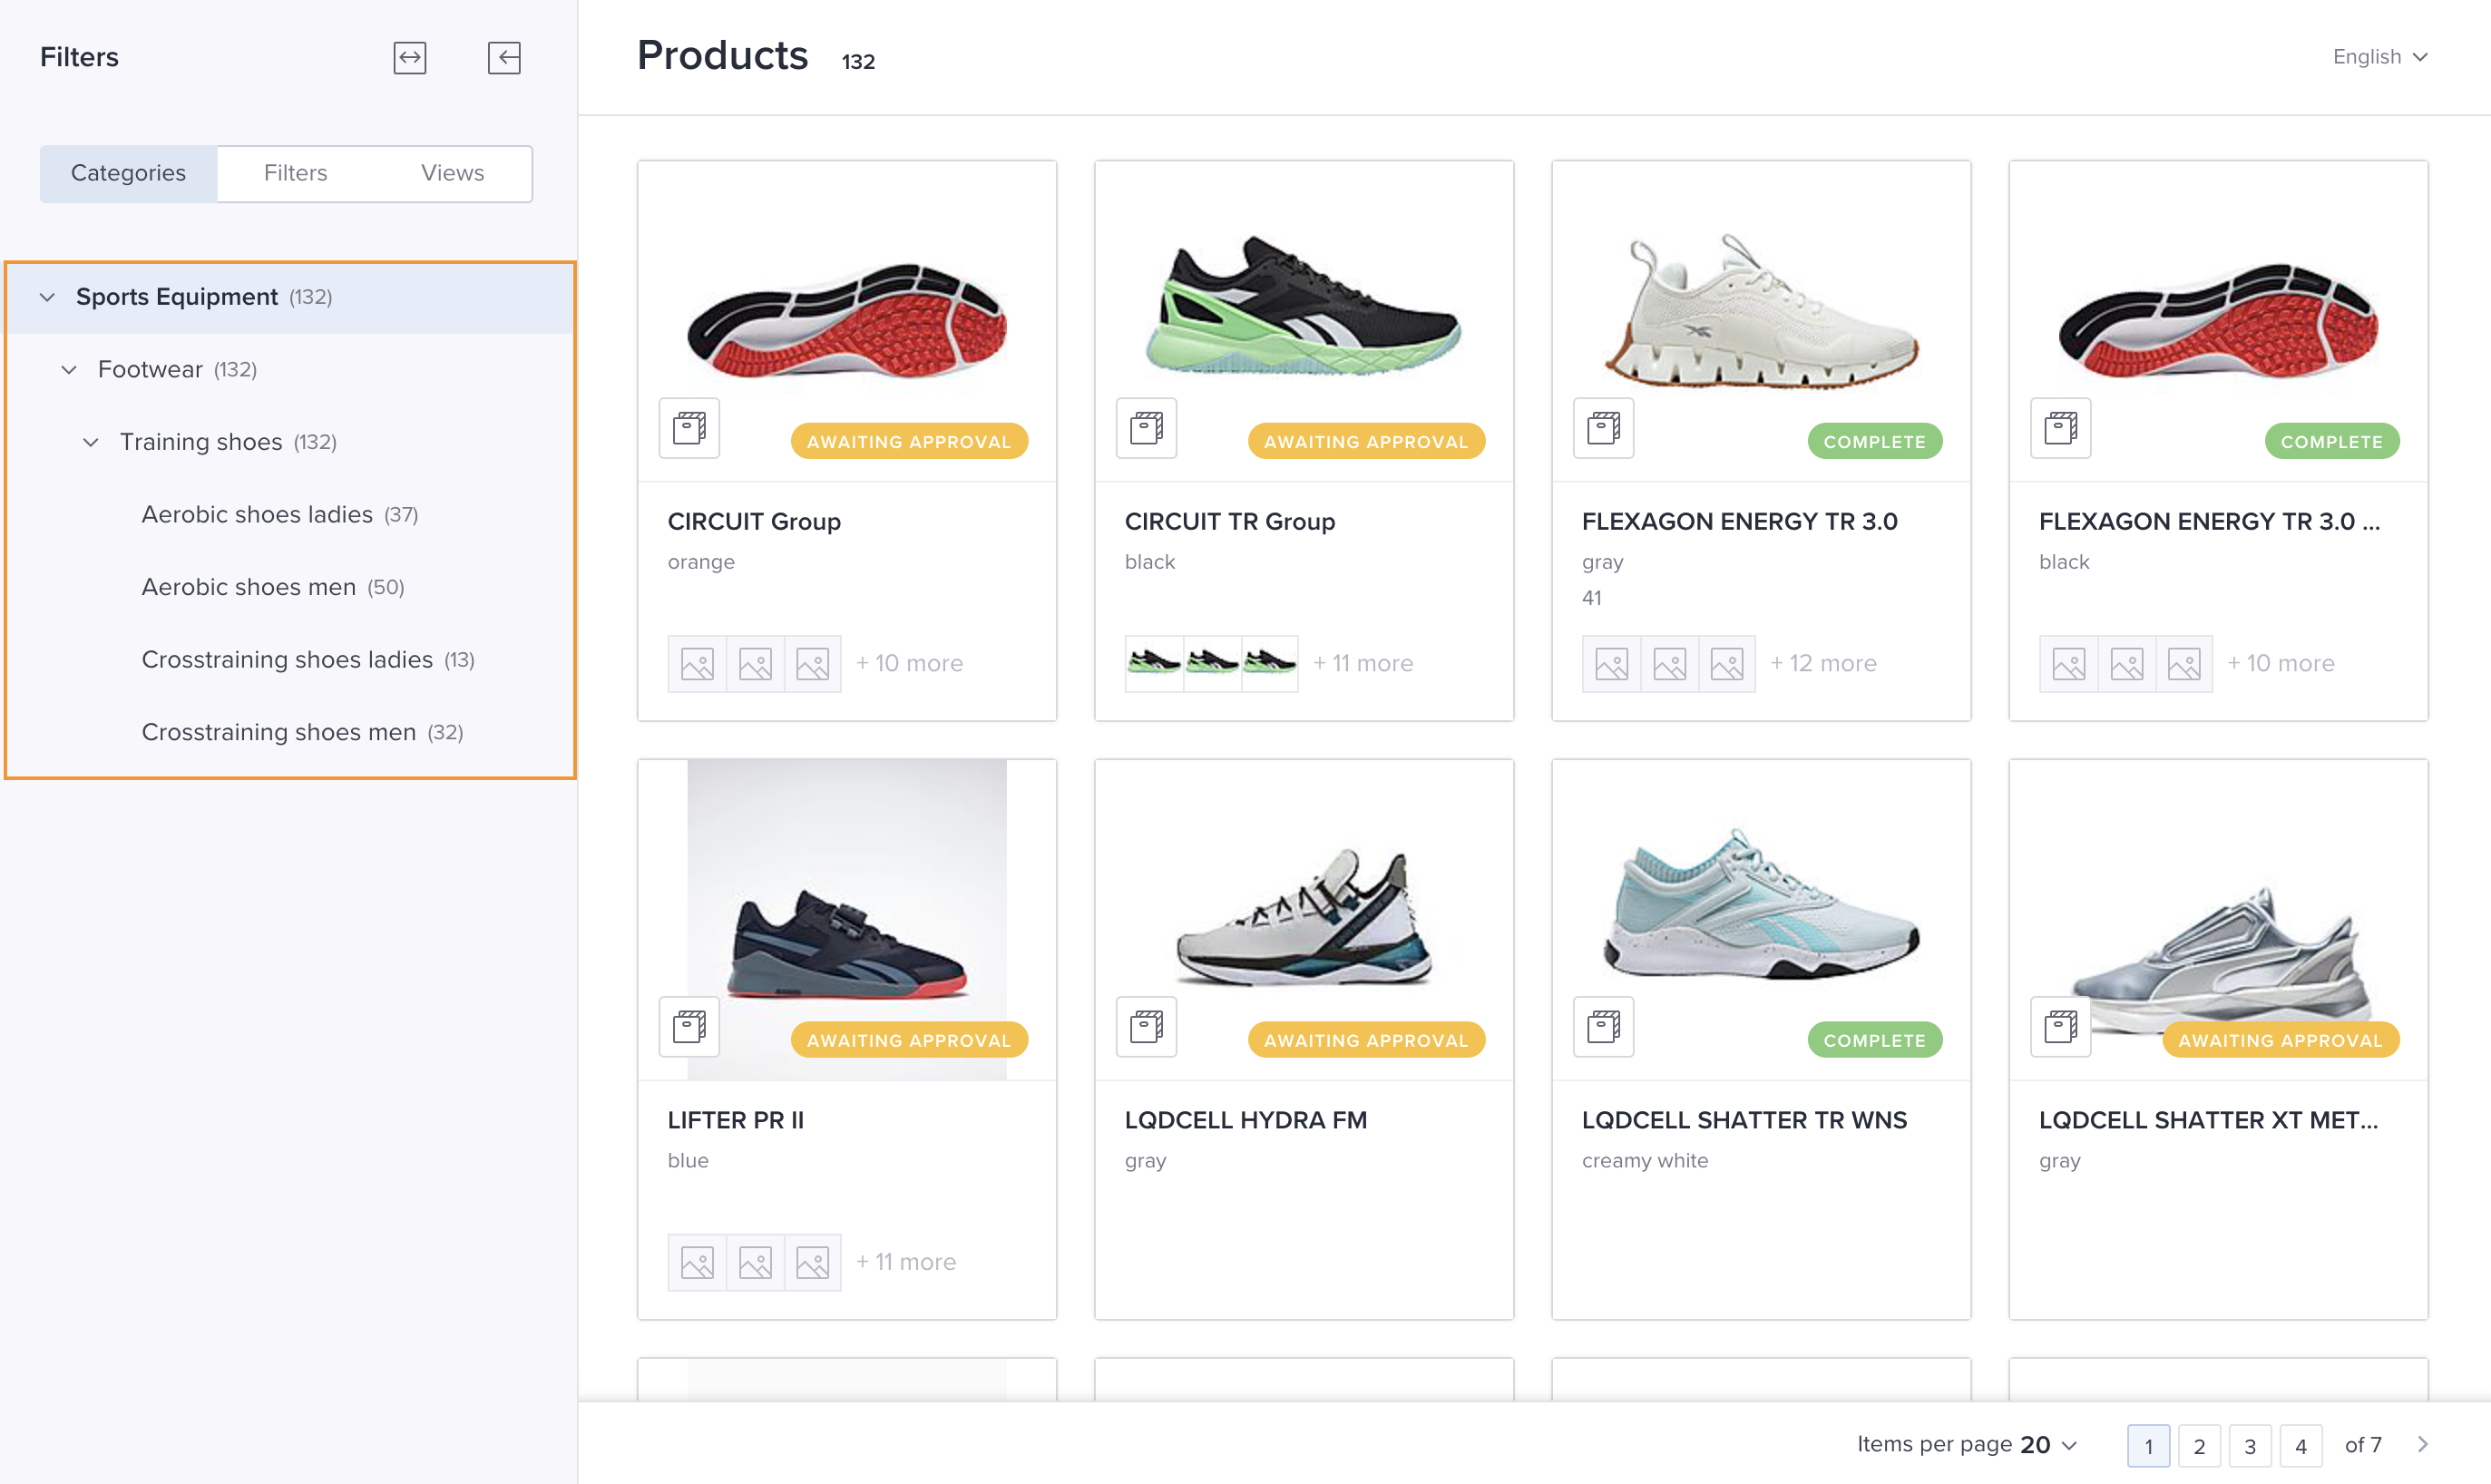
How PPE user can move products between categories
If the PPE user is allowed to move products between categories:- Open a product
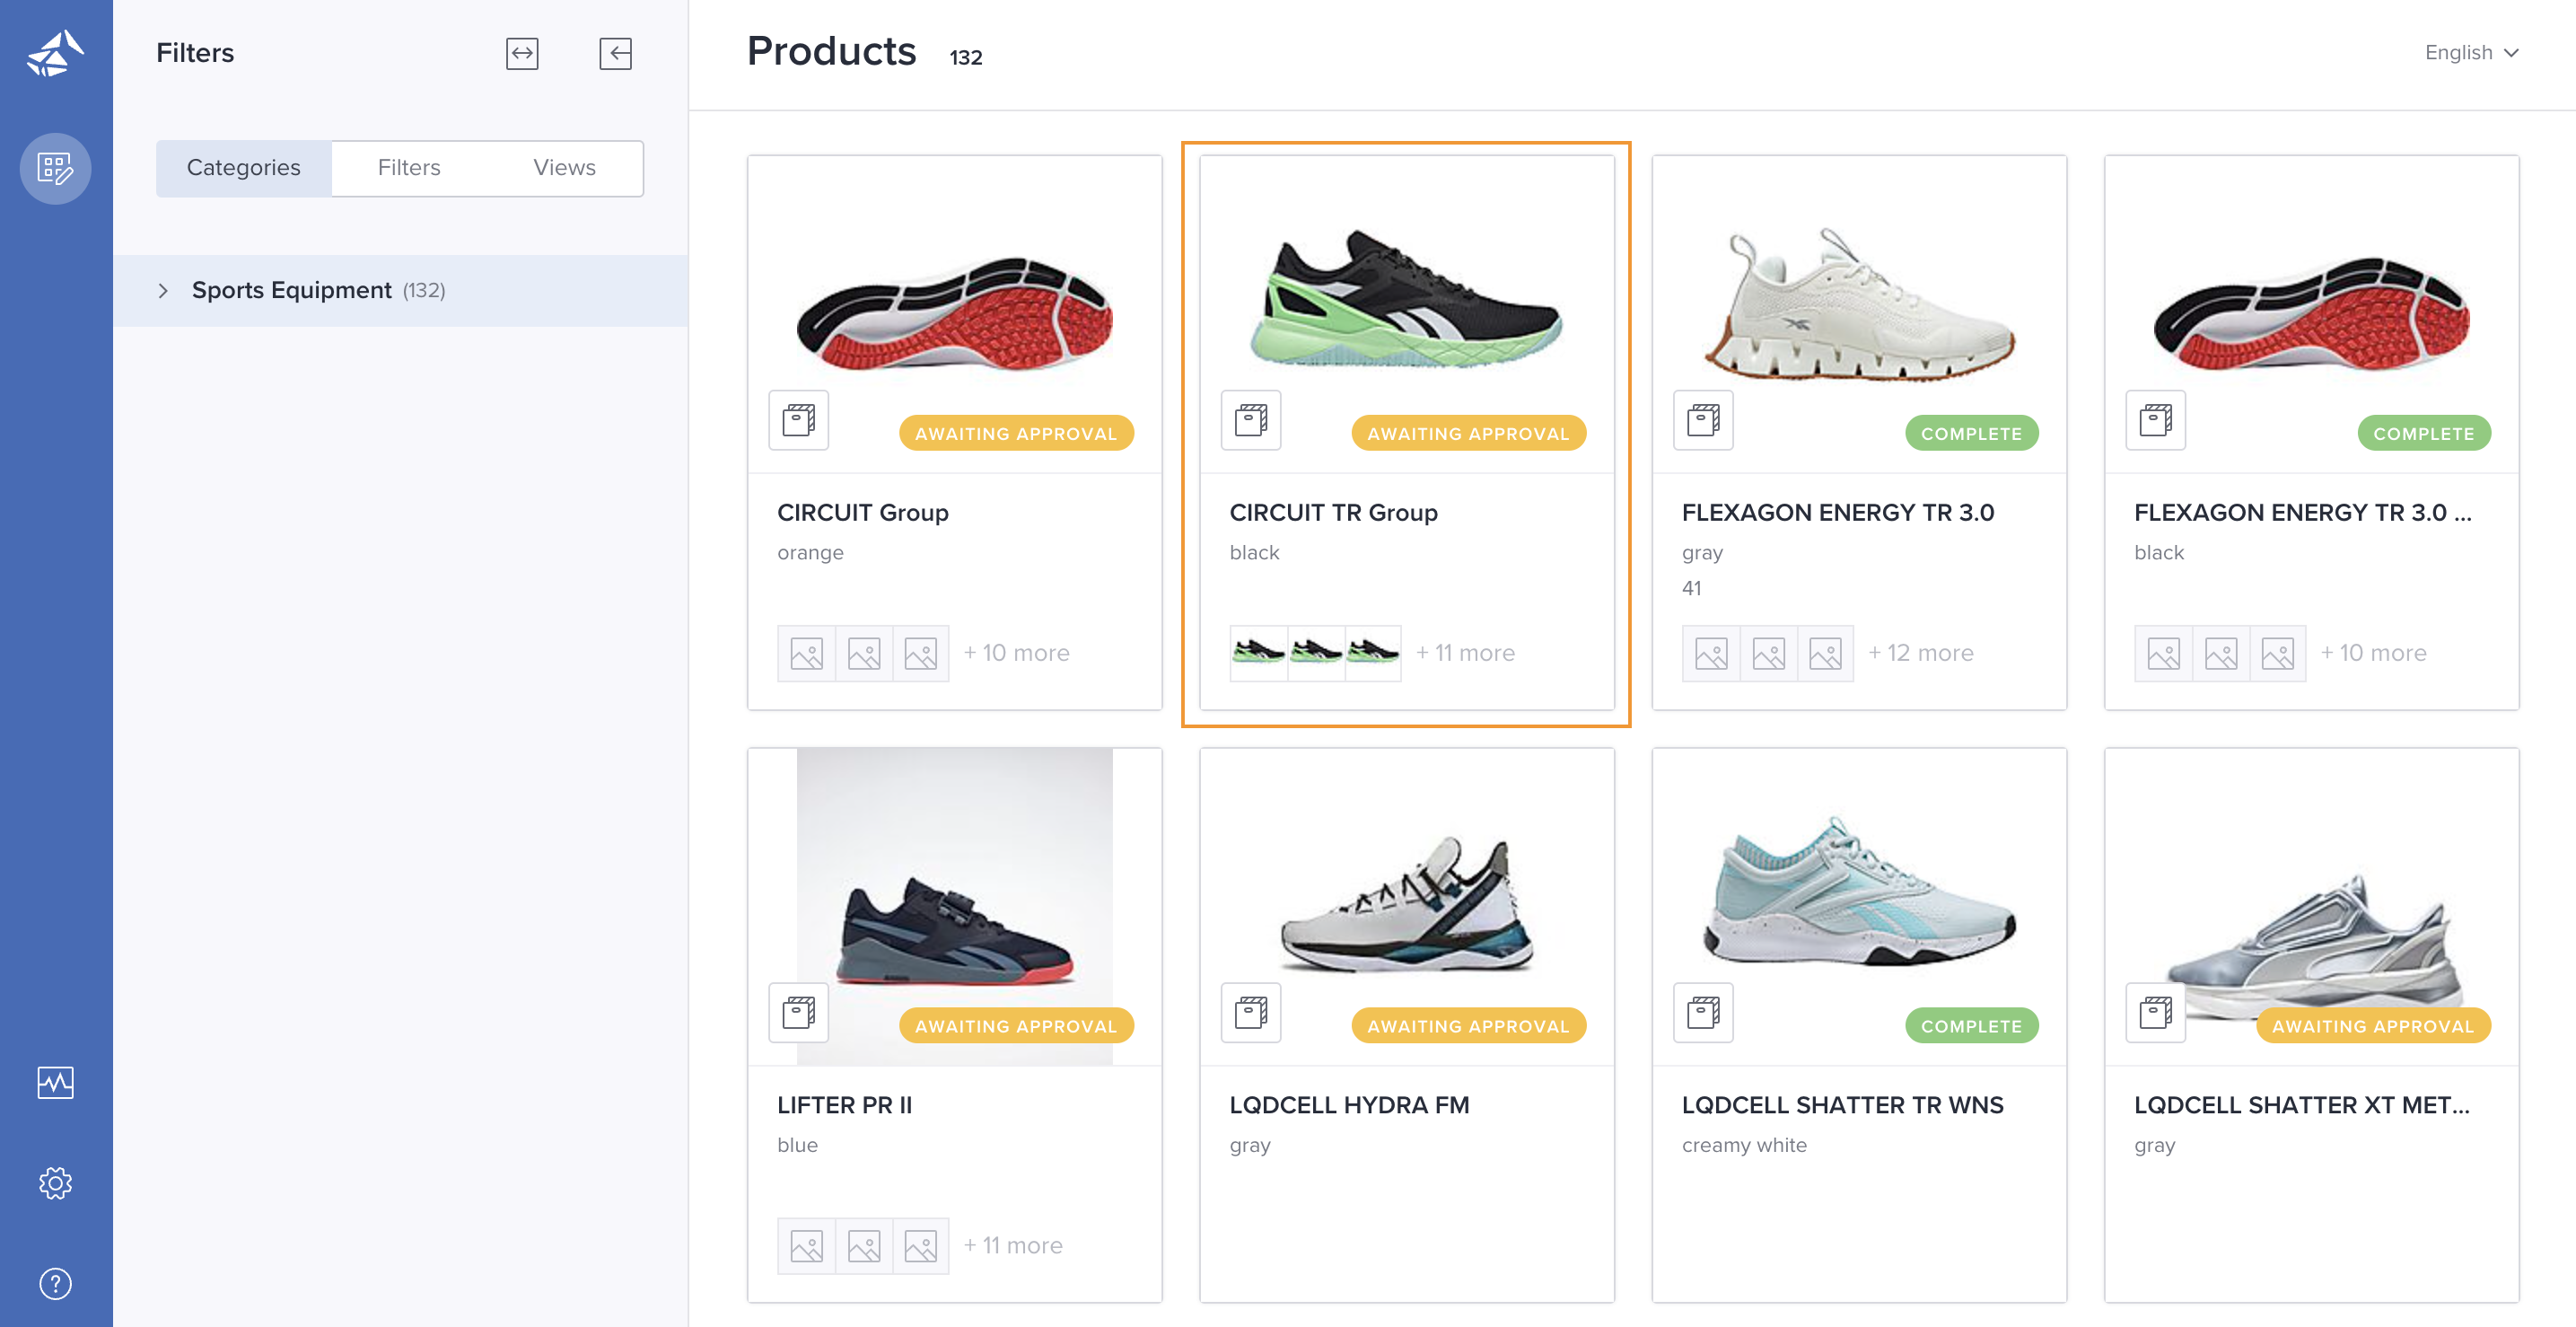
- Navigate to the Categories section and click the pencil icon (Edit categories):
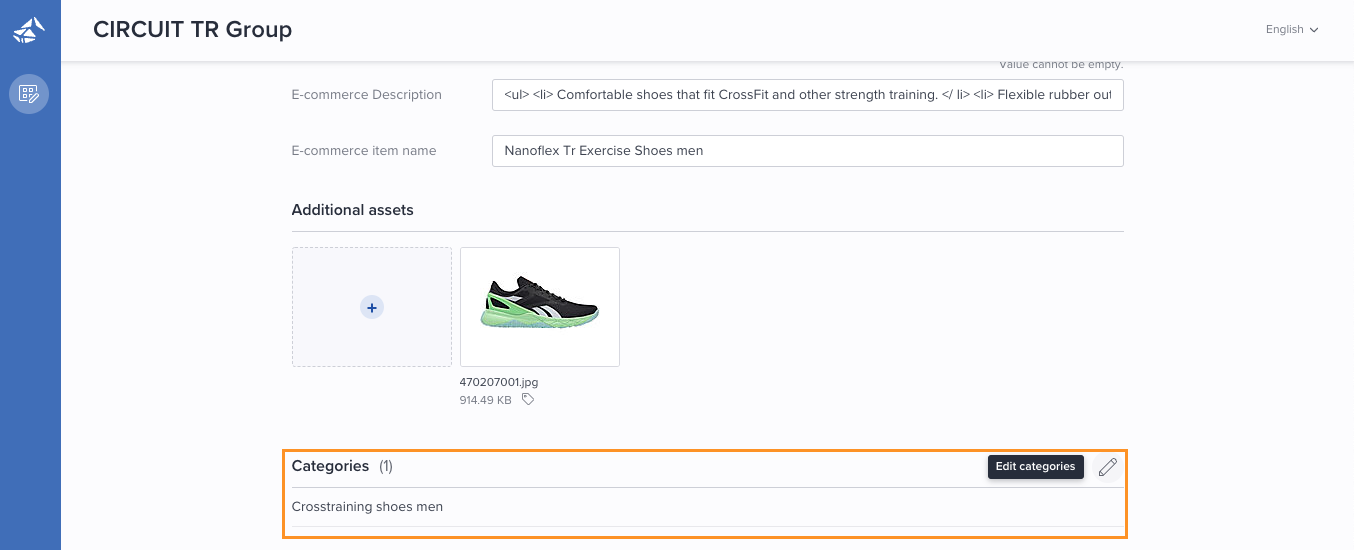
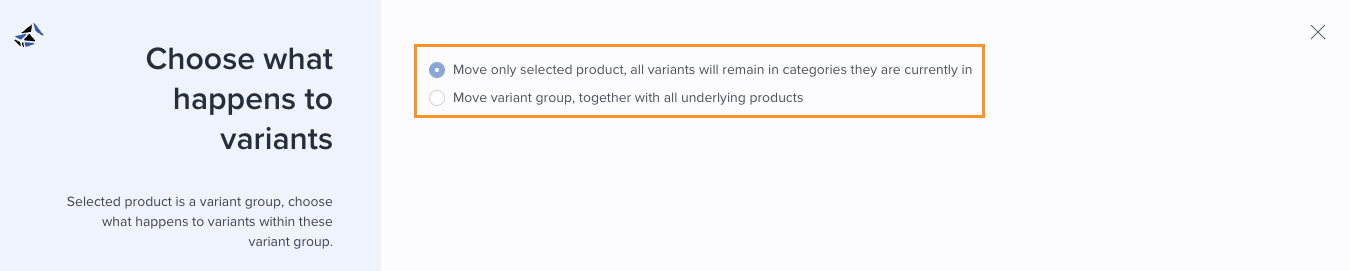
- If the opened product is a variant group, select whether to move only the variant group or the group including all variants.
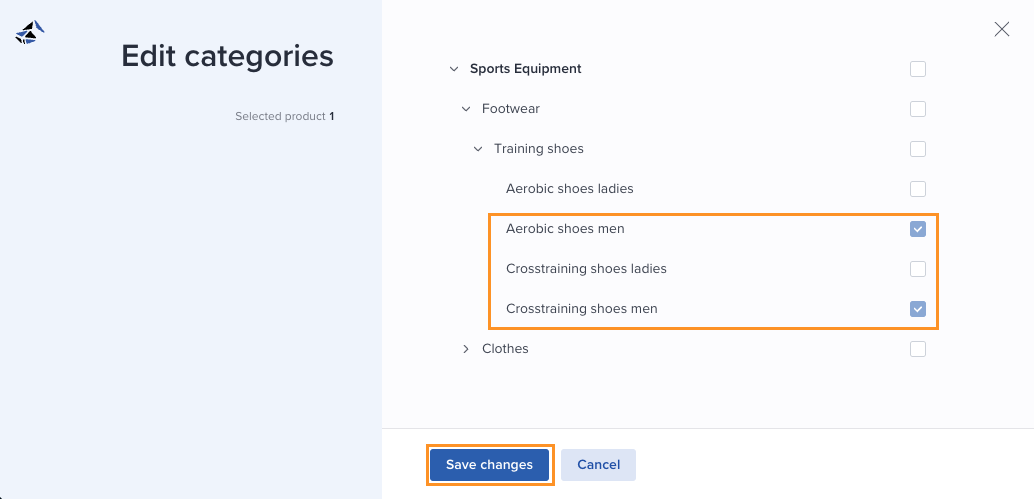
- Then select category(ies) to move the product(s) to, and click Save changes:
Languages and contexts
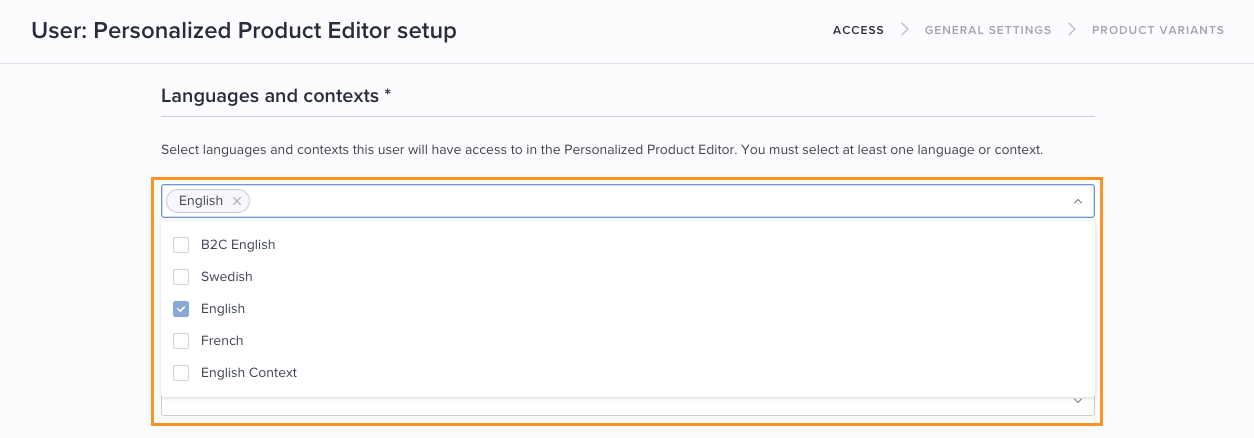
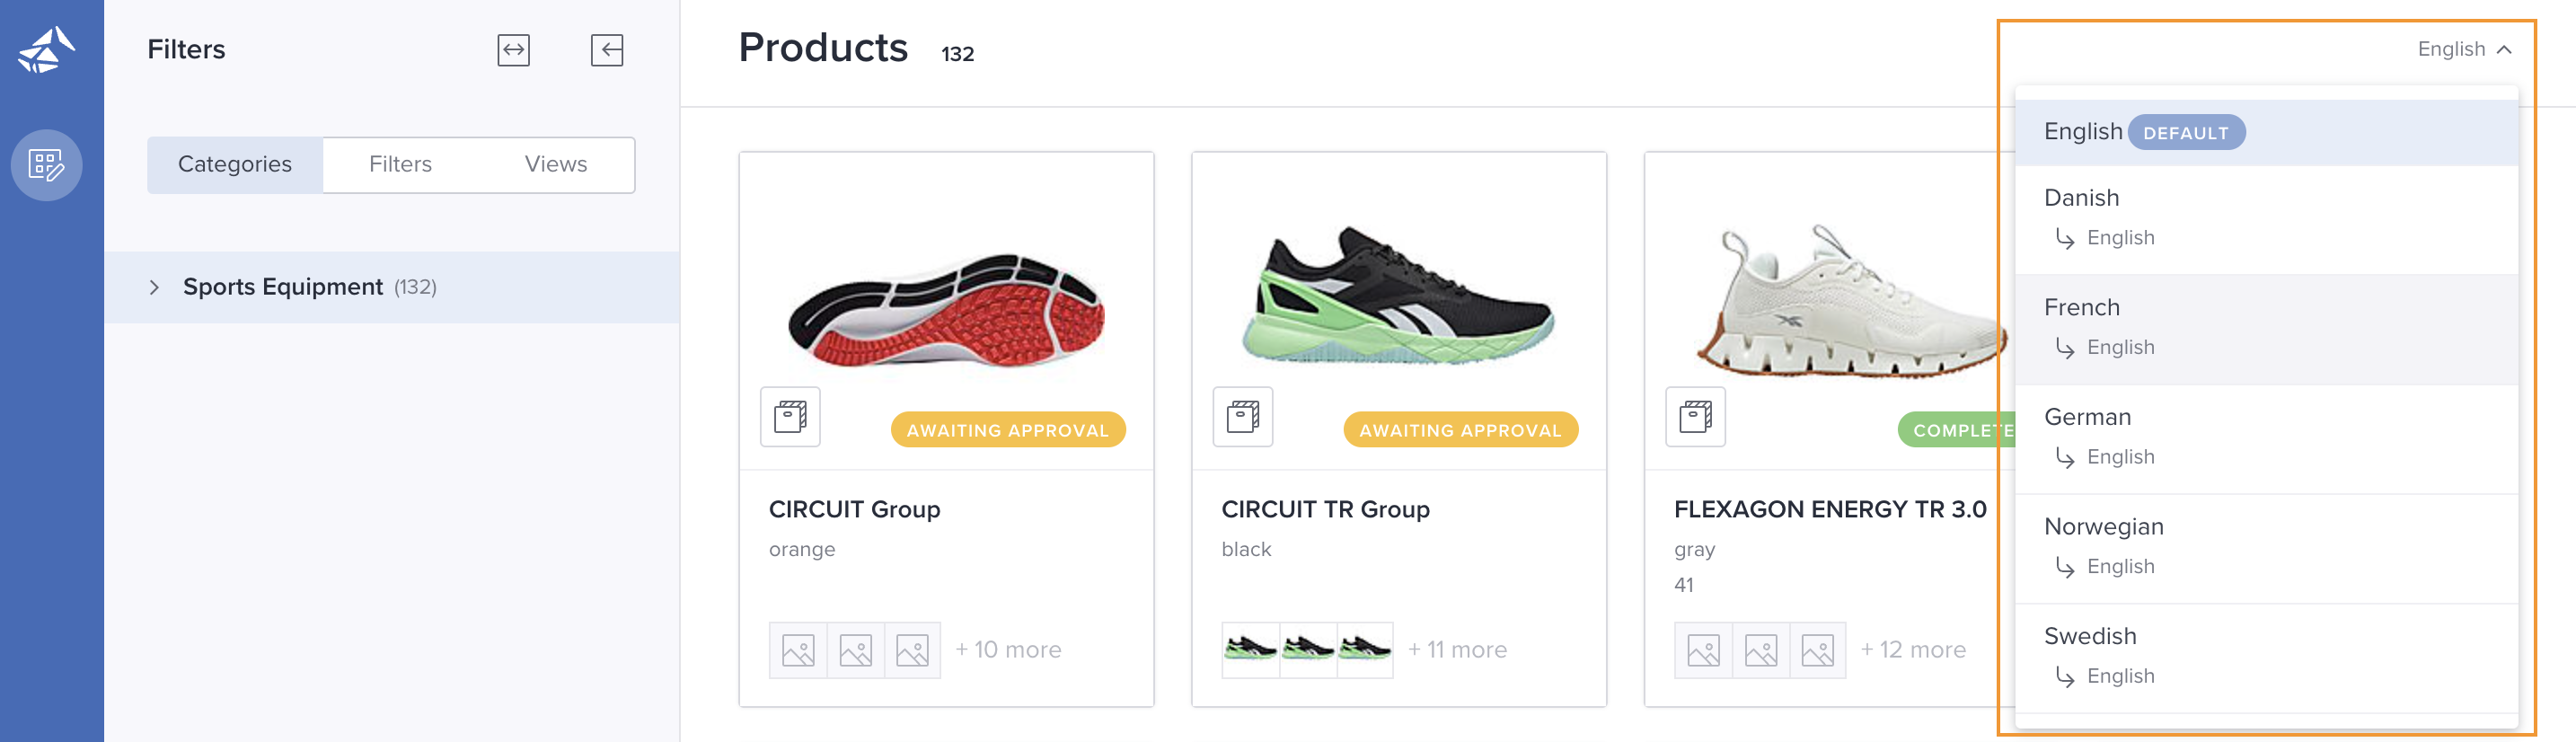
How languages/contexts are available to the PPE user
The option to switch language or context will be available in the upper right corner.
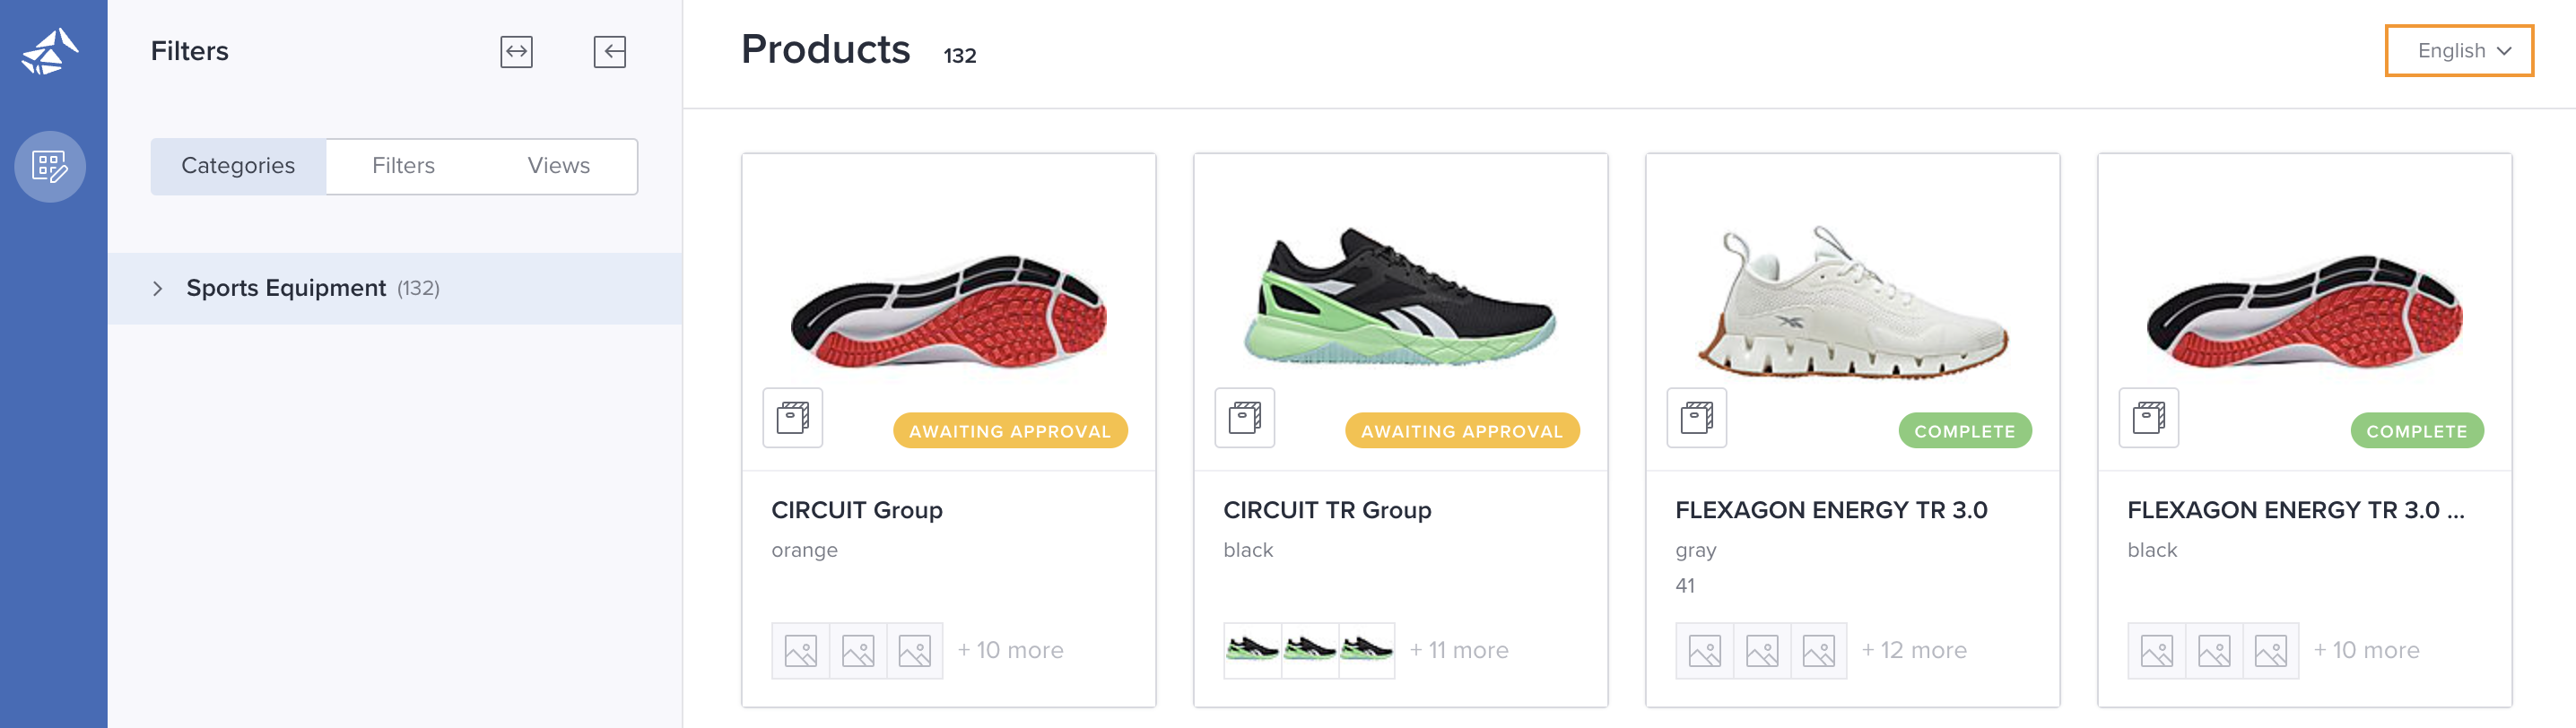
- Click on the drop-down menu and choose relevant language/context.
Asset access with labels
Configure which assets the user has access to. Assets shown in PPE will be filtered based on the selected asset labels.
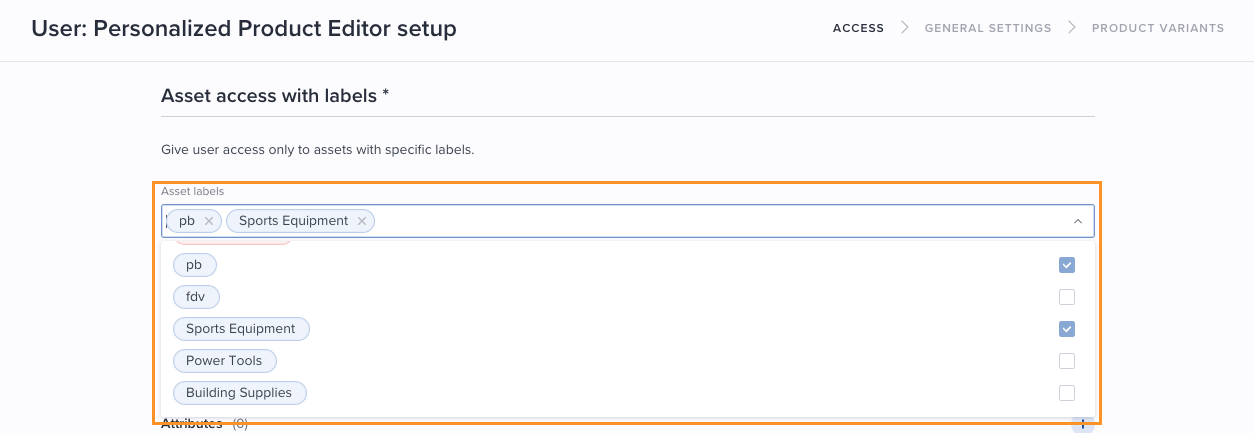
- In this example, only assets labeled with either pb or Sports Equipment will be presented to the PPE user.
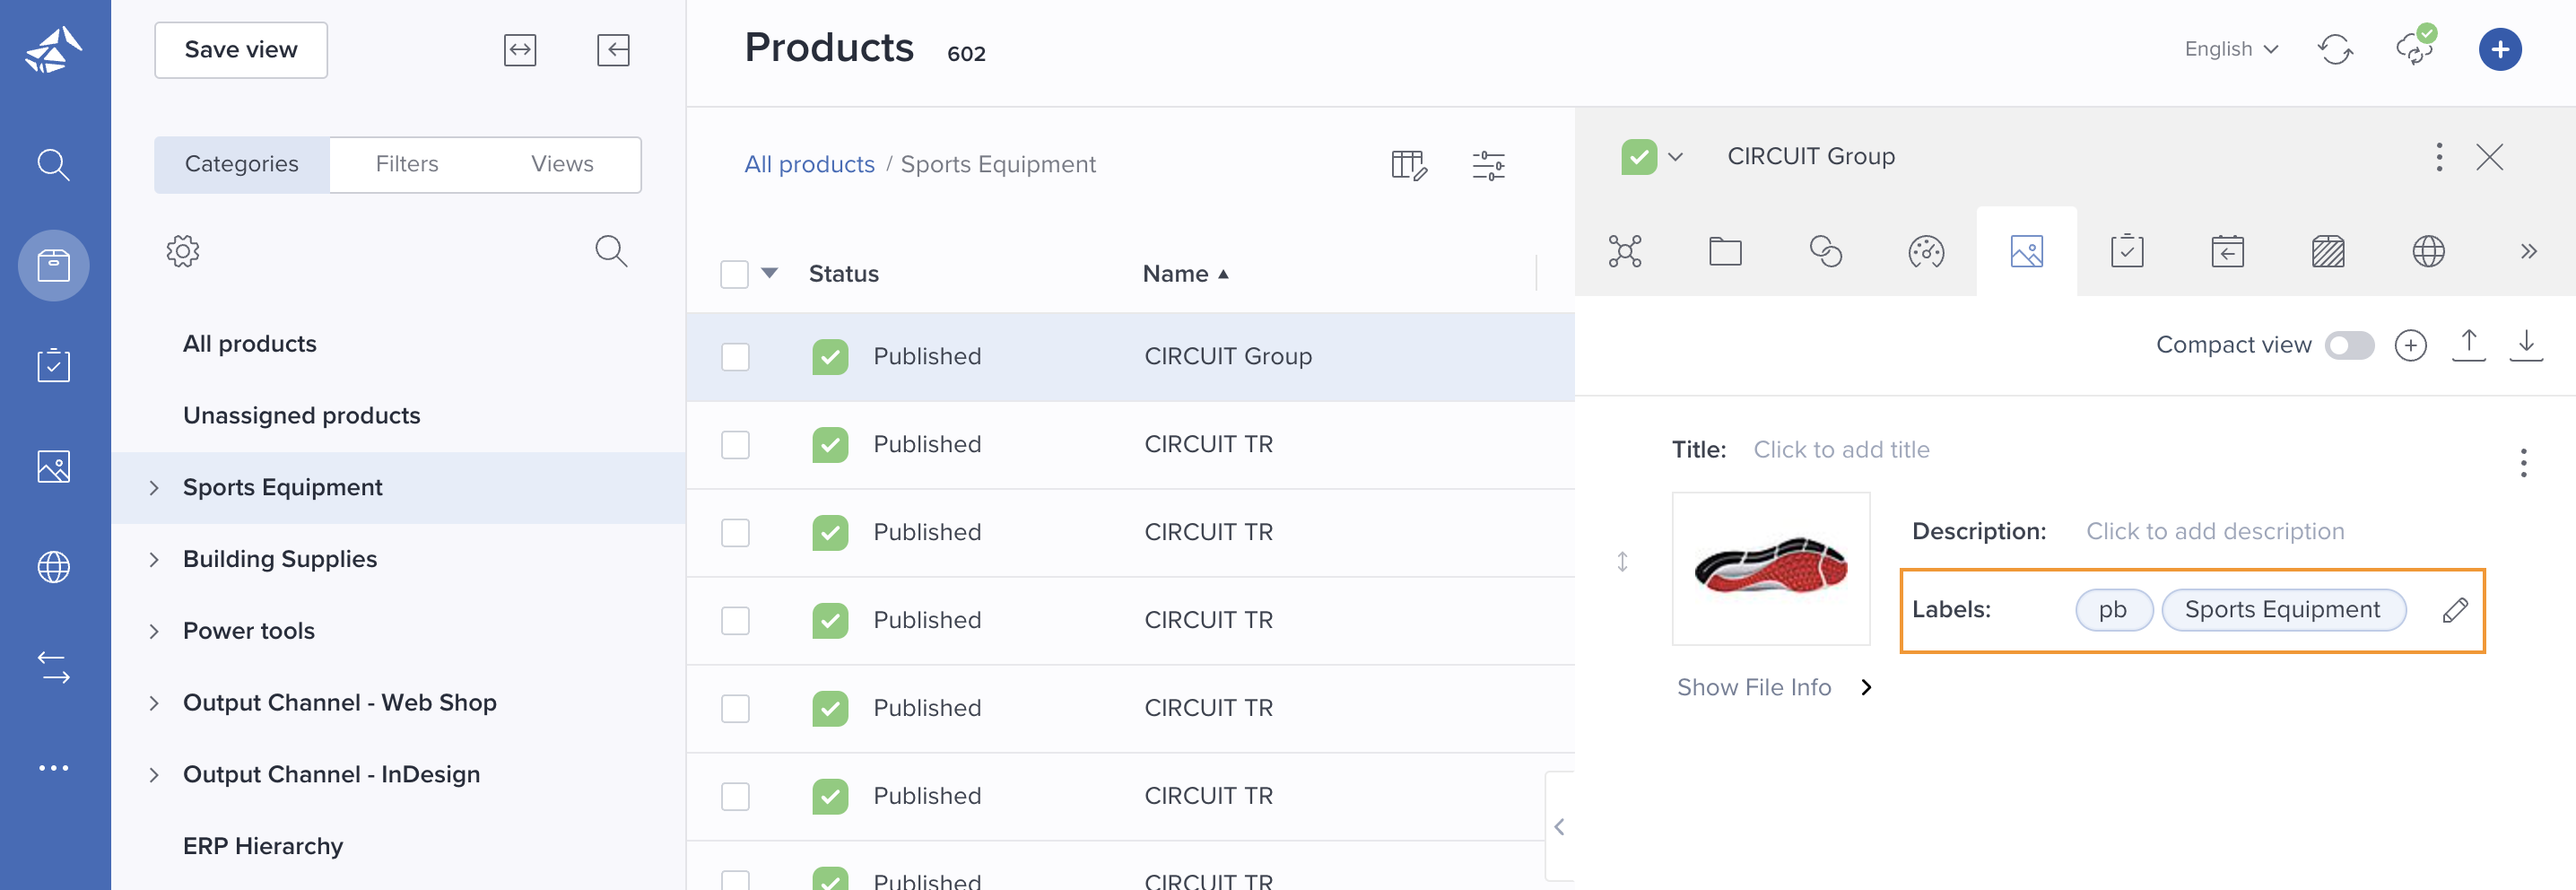
Please note: If an asset is "missing" from a product in PPE, it either doesn't have the relevant label assigned or the product doesn't have any assets added.
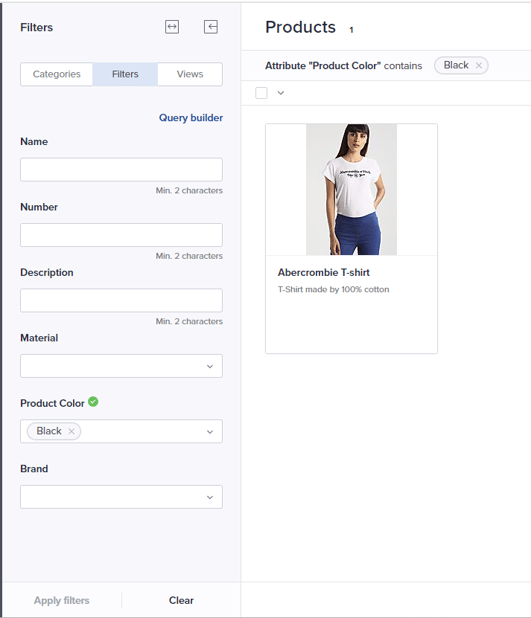
Product access control with attributes
Products may optionally be filtered by a specific attribute with a set value.
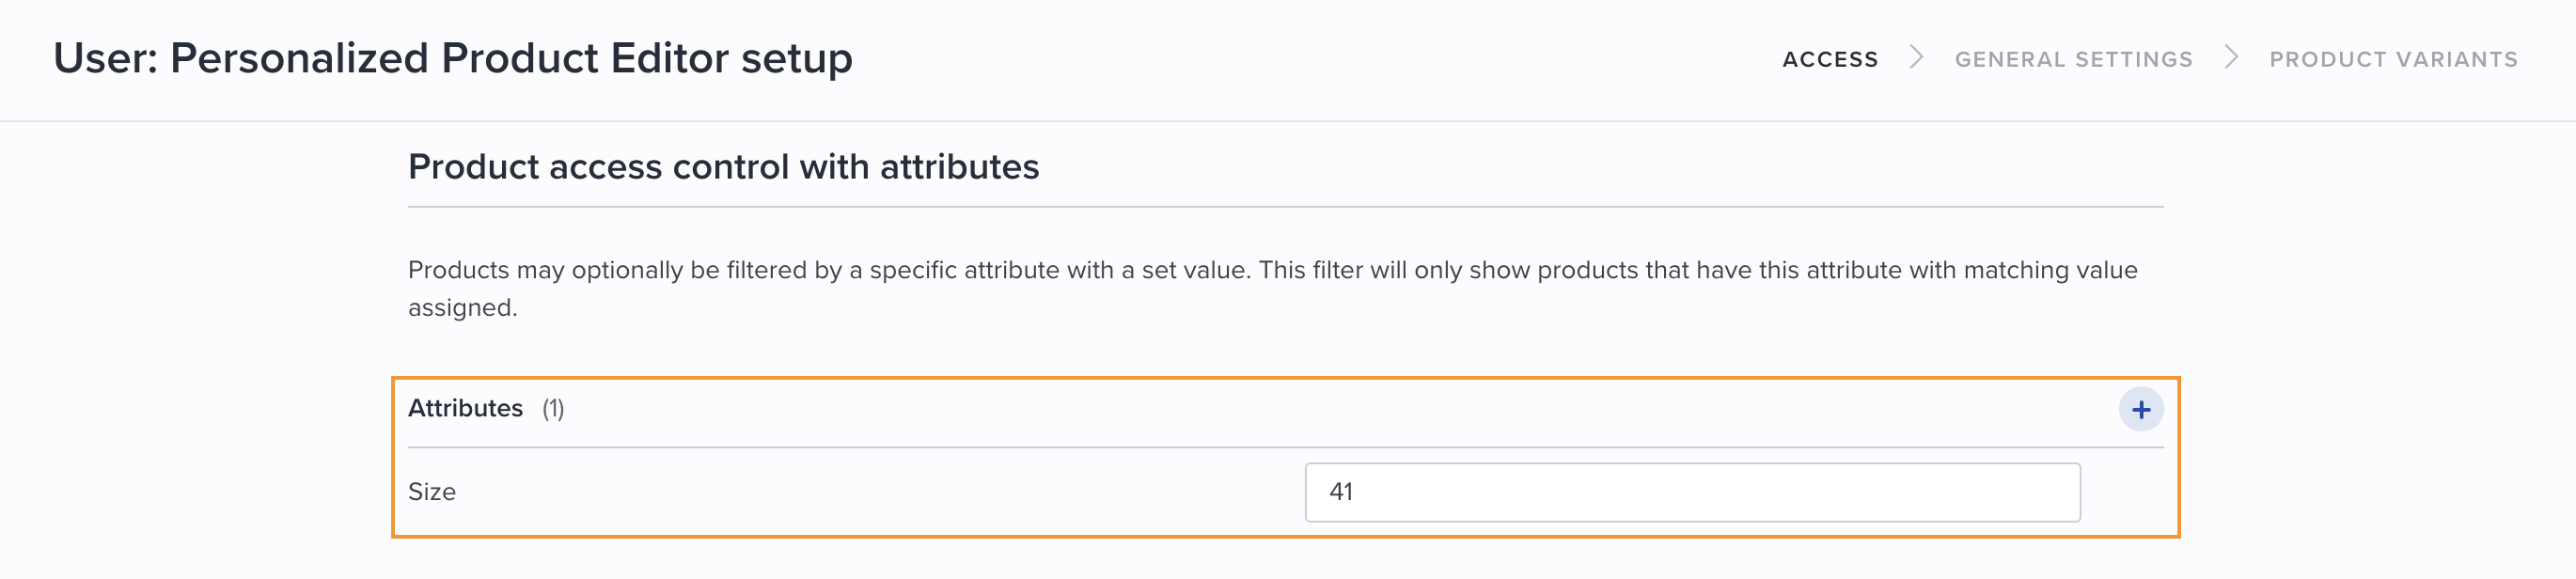
For the PPE user, only products having the attribute value as specified in the configuration, will be presented. Ref. example above with attribute Size and value 41:
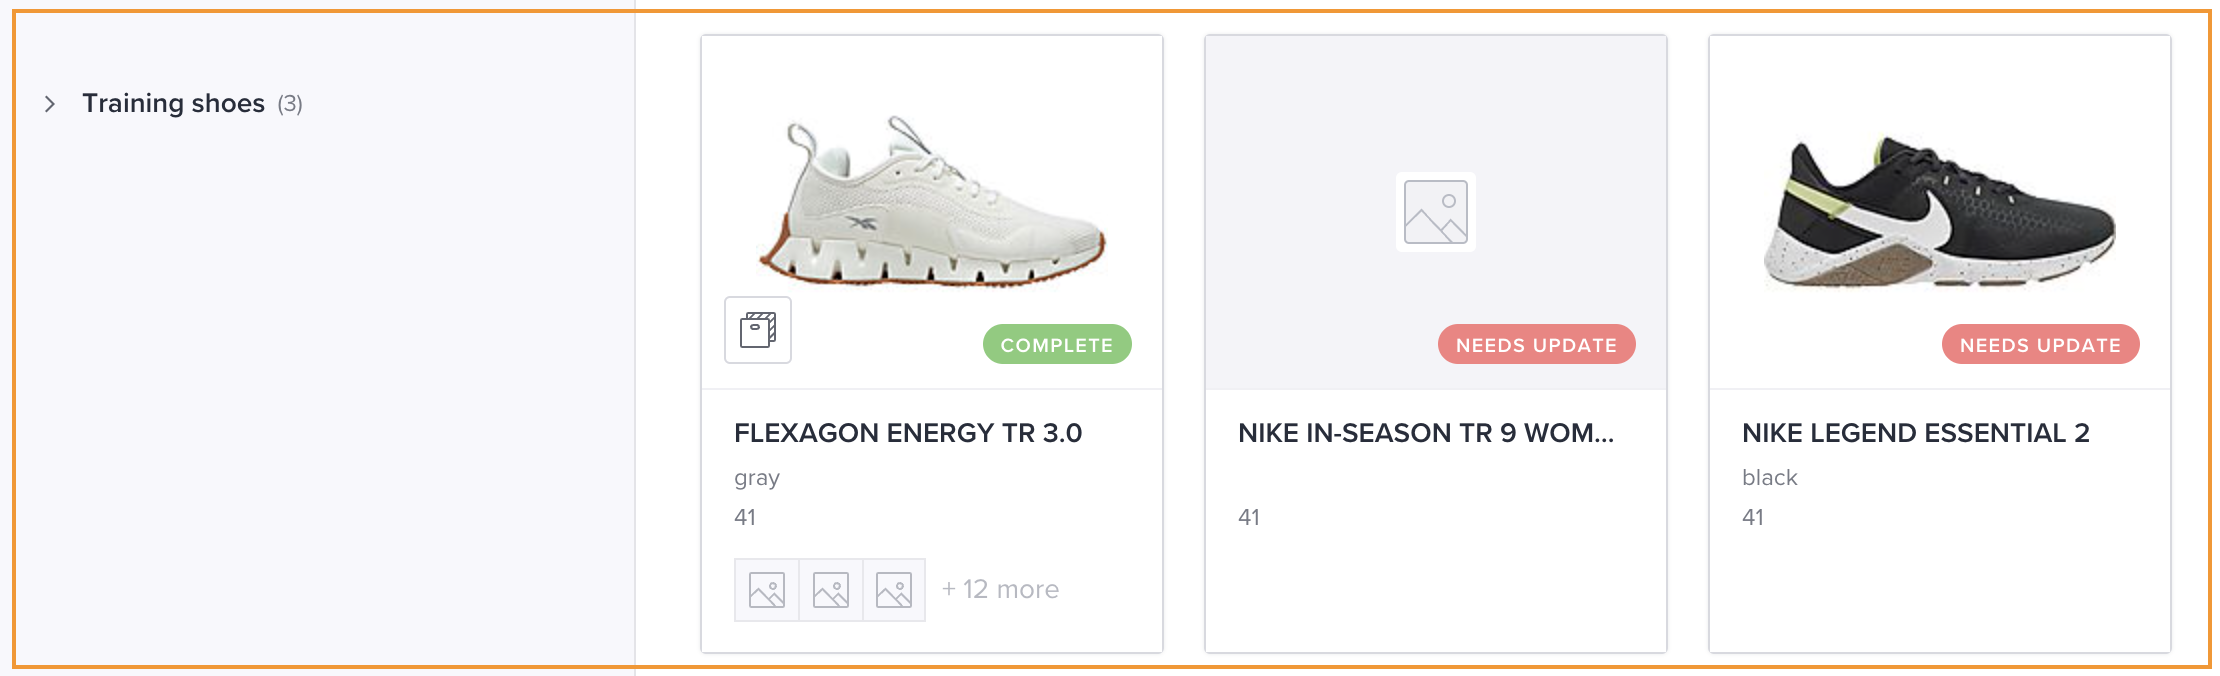
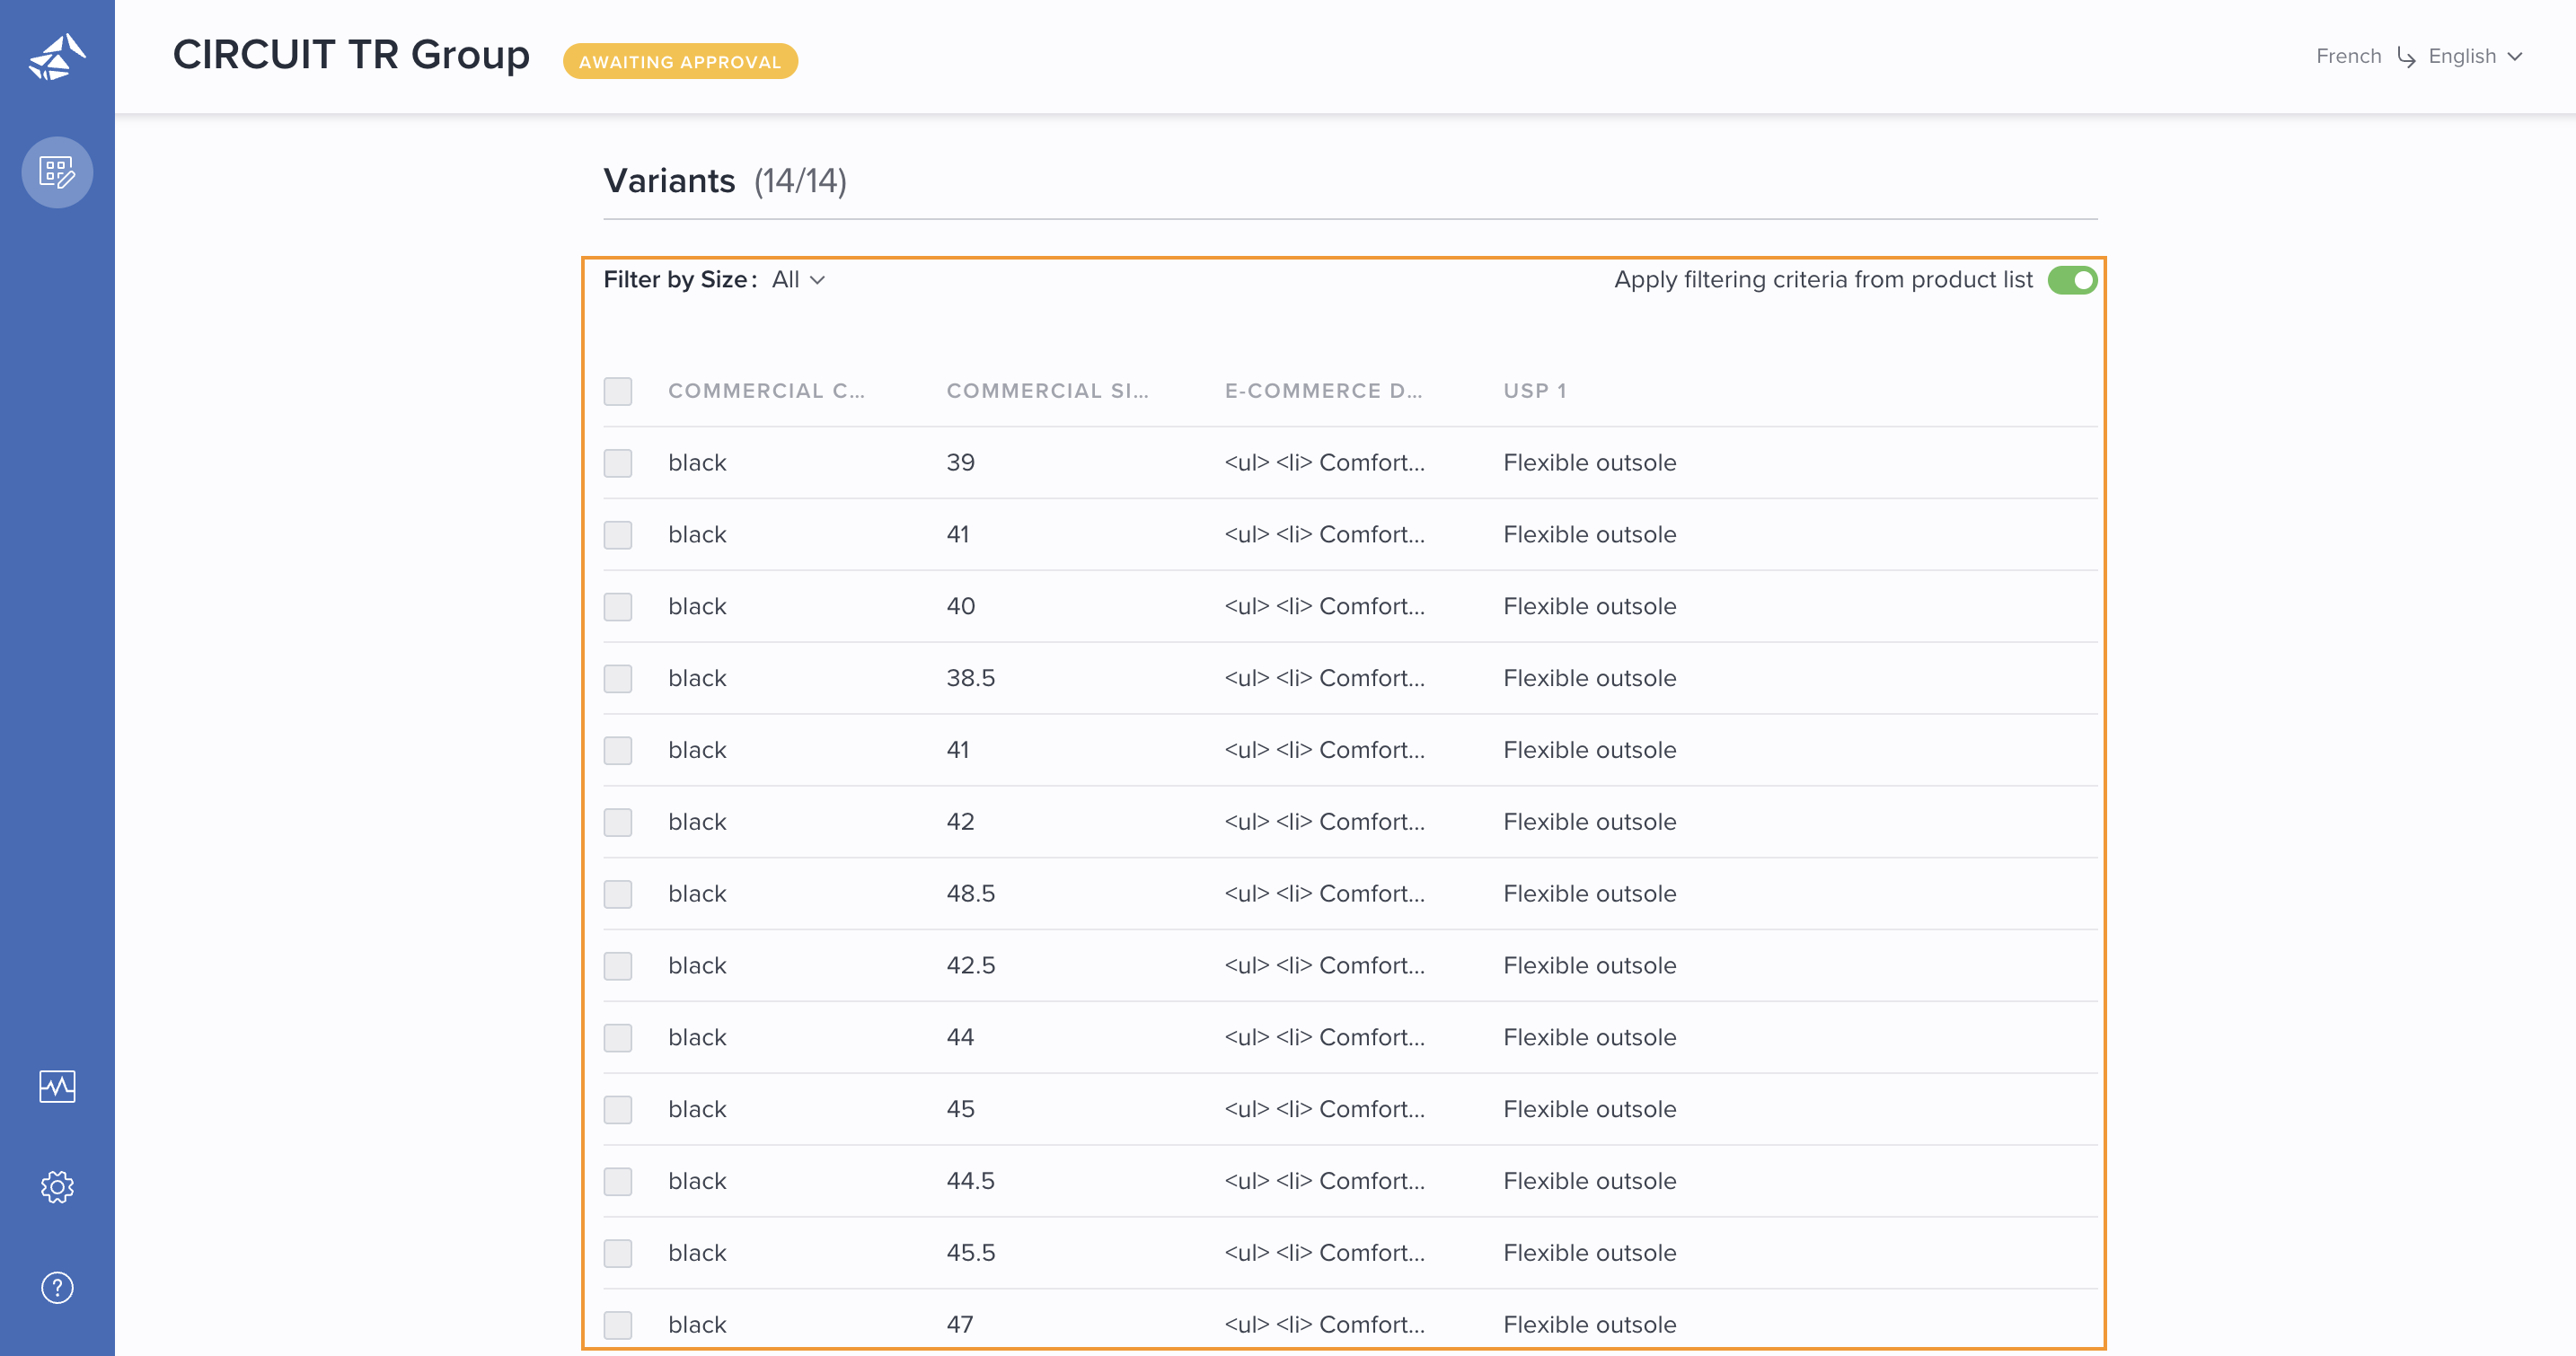
Grouping variants by attribute
You can select an attribute that can be used to group/filter variants within a variant group.

How grouping of variants is made available to the PPE user
In the above example, the variants are grouped based on the attribute Size.
When a variant group is opened, Filter by Size is presented in the Variants table. Now the PPE user can filter the variants by selecting a specific Size, or selecting All:
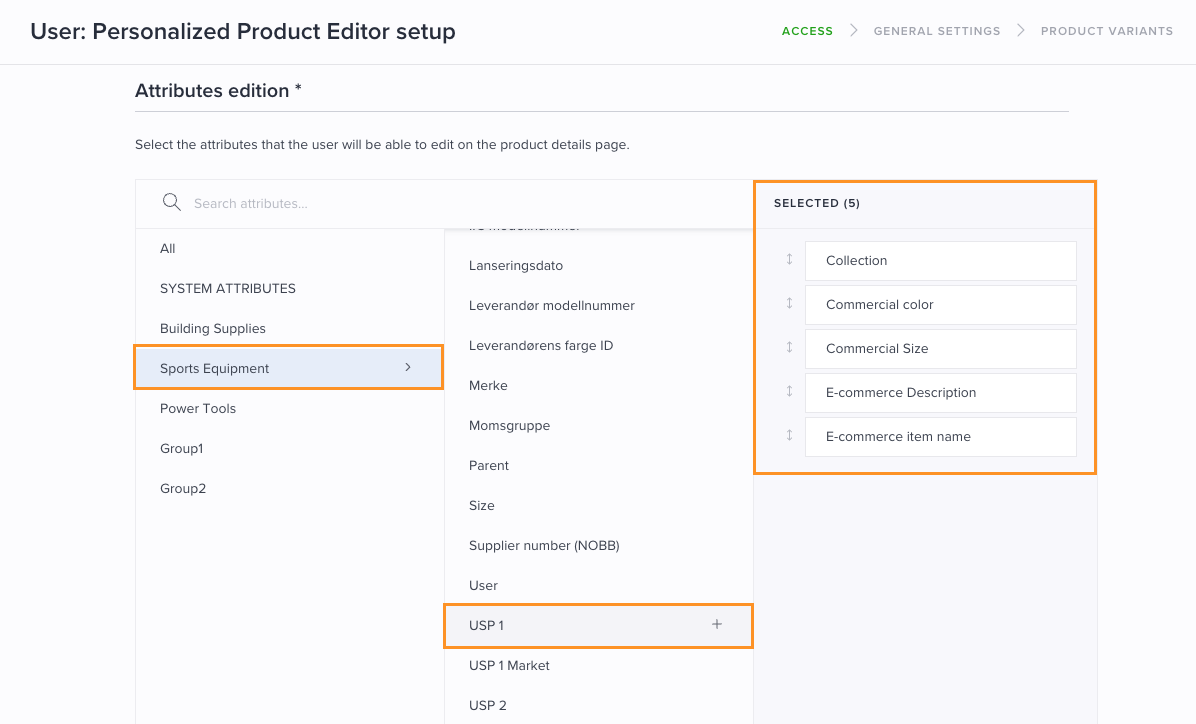
Attributes edition
- Find the relevant attribute by searching or selecting an attribute group in the left panel.
- Select attributes from the middle panel.
Selected attributes are presented in the right panel. - Optionally rearrange attributes by using drag-n-drop.
Note: Both the PIM Personalized and Supplier roles give access to edit product number and description. A new PPE role must be set up to disallow this. Please see Roles and policies management for details.
How attributes edition is presented to the PPE user
The attributes that the PPE user is allowed to edit are presented in the Attributes section for a product.

Please note: If an attribute configured for the PPE user is not presented, the product doesn't have this attribute assigned yet.
If the attribute is added to the product at a later stage, it will automatically be shown to the PPE user.
Overview of linked products attributes
Step 2: General settings
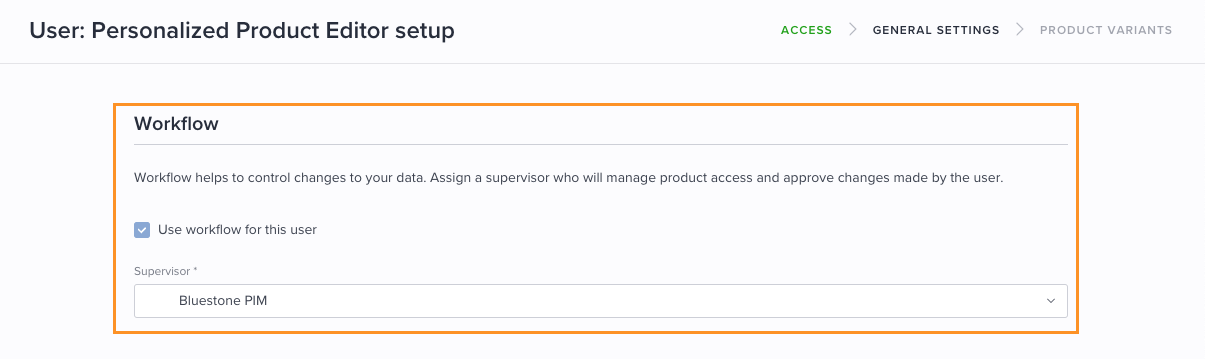
Workflow
Note! A specific attribute definition is required for utilizing the approval workflow. Please see Create a workflow attribute (PPE) on how to set it up.
How Workflow is presented to the PPE user
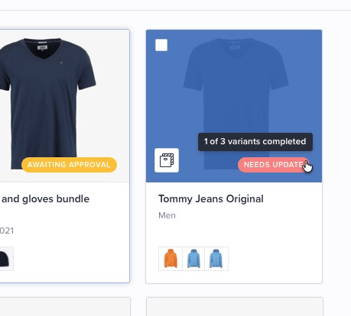
The PPE user can easily see the Workflow status on each product tile in the grid. 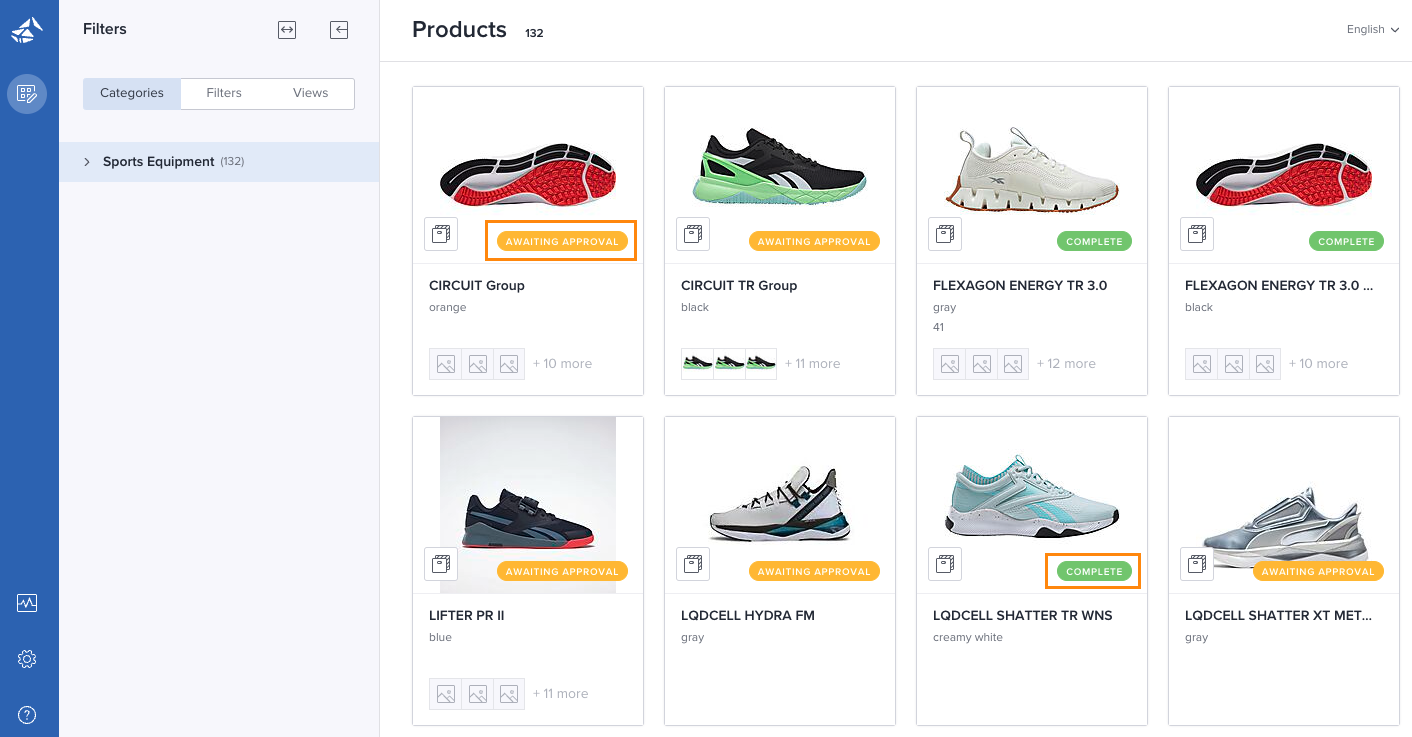
- Needs update
The supervisor has asked the PPE user to update the product, or approved an edit request sent by the PPE user. - Awaiting approval
The PPE user has asked the supervisor to review/approve performed changes. - Approved
The supervisor has approved the changes made by the PPE user. - Complete
The product is ready for publishing.
When the PPE user opens a product, he can edit information he is given explicit permission to update. After having made an update, the user has the following options:

- Back to products
This action will cancel editing. The user must confirm discarding changes and is routed back to the grid. - Save and finish later
This option will save all changes made, and the user can come back to finalize the product at a later time. - Send group/variant for approval
This action will save all changes and send the product for approval by the supervisor.
Note: PPE users don't have to wait for all products in a bundle/variant group to be updated before sending them for approval. Products being part of a bundle/variant group can be sent for review and approval separately.
How the supervisor reviews changes made by the PPE user
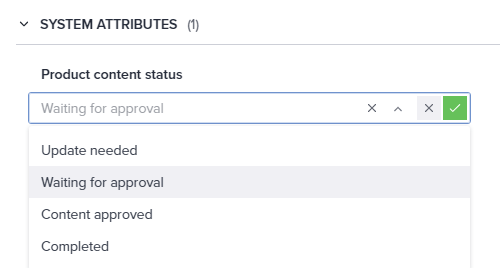
- Find relevant products by using the Filters. Filter by the attribute Product content status and value 'Waiting for approval'.
- Open one of the products and review the changes.
- Update the Product content status according to your findings:
- If the changes are not ok, set the status to 'Update needed'.
- If the changes are ok, set the status to 'Content approved'.
Tip! The supervisor can also update the value of the Product content status attribute for several products in bulk, e.g. after having reviewed a large number of products. To do this, select the relevant products from the grid and click Edit | Attributes. See Use product bulk actions for details.
Completeness requirements
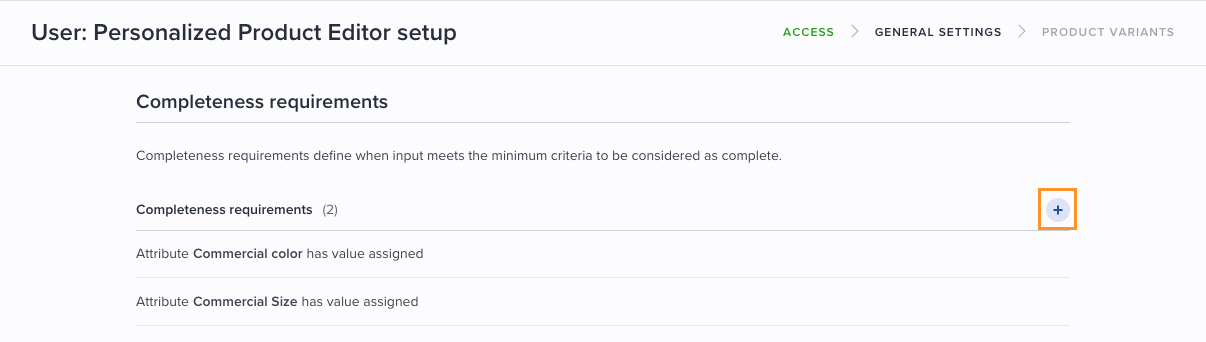
- Click the plus icon (Add) and select relevant requirements from the drop-down menu.
How completeness requirements are presented to the PPE user
The PPE user can easily see all requirements on top of each product page. By clicking Details, the status of each requirement is presented:

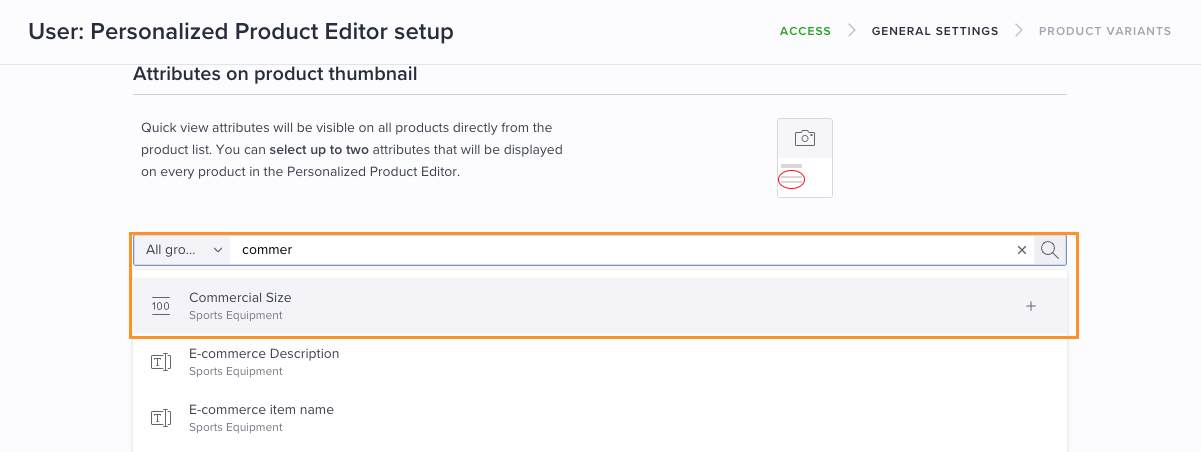
Attributes on product thumbnail
You can select up to two attributes to be displayed on each product tile for the PPE user.
Filters

Note: It's recommended to include product Name, Number, Description and Product type as filter options.
How filters are presented to the PPE user
The attributes selected as filter options for the PPE user will be presented in the Filters panel.
Note: The operator used for multiselect/dictionary attributes is 'some of these'. This means that products where this attribute contains at least one of the specified values will be returned.
How the PPE user can utilize the Query builder
PPE users can utilize the Query builder to find relevant products, by clicking Query builder from the Filters panel.

Please see Filtering using the query builder for details on how to build queries.
Step 3: Product variants
Variant attributes edition
Select which attributes the user is allowed to edit for variants.
How editable variant attributes are presented to the PPE user
The attributes the user has been given edit access to, are presented on the variants page (as long as they are added to the product):

General information is presented on the top. This includes the product Name, Number, Description and Product type:

Variant-level attributes (VLA) propagation
Select whether VLA values should be overwritten or kept on variants when edited on Variant Group level:

Note: Overwriting existing values will not apply to variant-defining attributes.
How VLAs are presented to the PPE user
On Variant Group level, the variant-defining attributes are presented with the following icon:

In this case, the attribute value on Variant level will never be overridden:

On Variant Group level, attributes that are not variant-defining are presented without any icon:

If you have selected that VLA values should be overwritten and the VLA is not variant-defining, the value on Variant level will be inherited from the Variant Group:

Note: The value can still be changed on Variant level.
Overview of variant attributes
You can select a maximum of five attributes that will be presented for the variants on the Variant Group page:
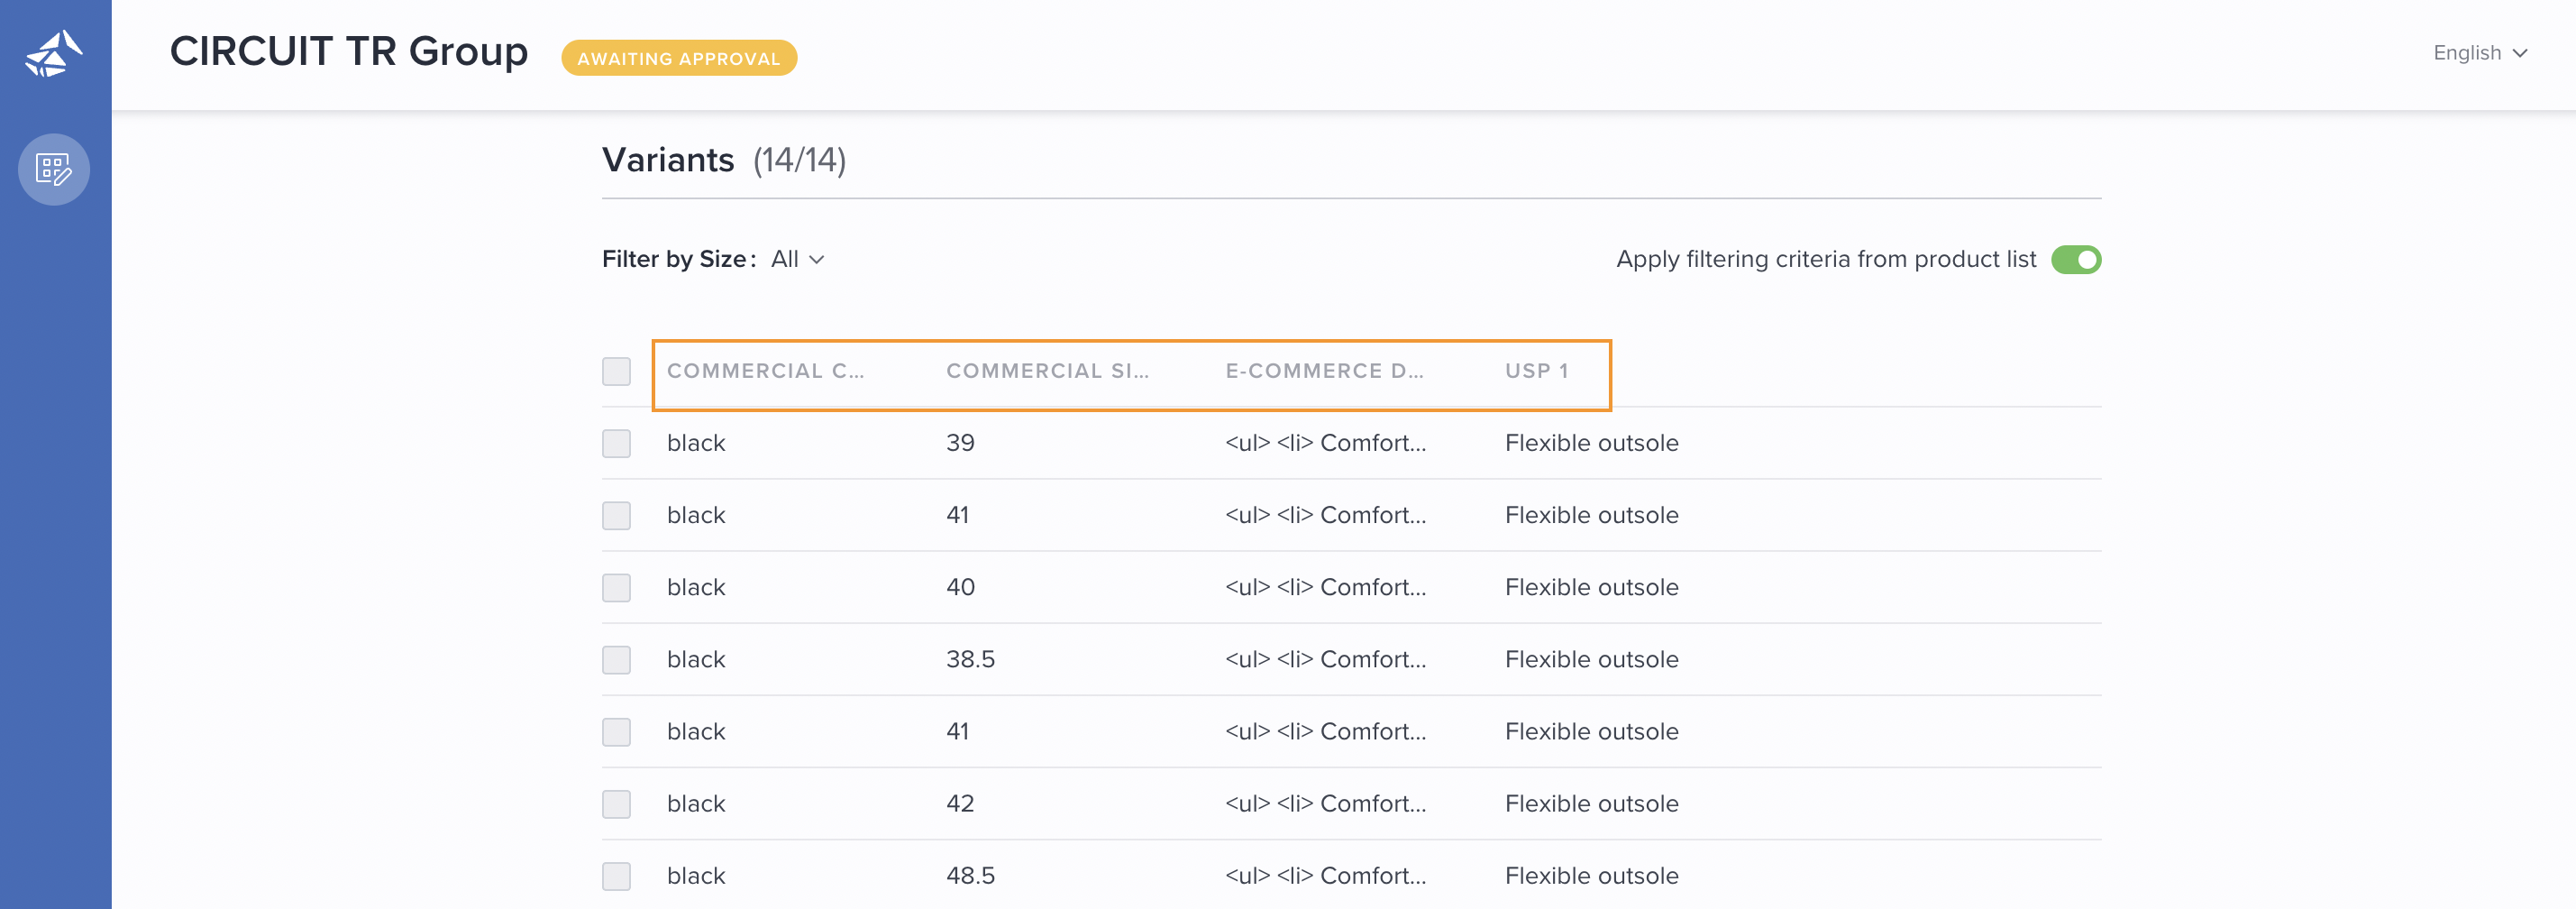
How variant attributes are presented to the PPE user
The attributes the user has been given access to, are presented in the variants table on the Variant Group page:
Complete the PPE setup
When you are happy with the configuration, click Save to assign the setup to the PPE user. If the user is newly created, login credentials can now be sent.
Edit the PPE setup for a user
The different parts of the PPE setup can be edited directly from the user's details panel. For example, if you need to change which category the user has access to, hover over the Category section and click the pencil icon (Edit).
Please see the relevant section below Overview for details.