You need to be given explicit access to manage user groups.
Managed role having this permission: System admin.
Create a user group Duplicate a user group
Edit a user group Activate/deactivate a user group
Overview
User groups can be utilized for grouping users with the same set of roles together. By using groups, access management will be more efficient.
Select Settings | User groups from the main navigation bar to create and manage your organization's user groups. Any existing user groups are presented:

Click a group to open its details panel. See the following sections for information about each tab.
Tip! Please see User management for details on how to manage users.
Details tab
Contains the group's Name and Description. Please see Edit a user group for details.

Group members tab
The user group consists of one/more members. Please see Edit members of a user group for details.

Roles tab
The group is connected to one/more roles. Each role has a set of permissions inherited by the group members. Please see Edit roles of a user group for details.

Tasks tab
Tasks can be assigned to the group. All group members can see and perform such tasks. Please see Assign tasks to a user group for details.

Note: The group must be activated before any tasks can be assigned.
Policies tab
The group can be connected to one/more policies. Each policy has a set of permissions inherited by restricted users in the group. Please see Edit policies for a user group for details.

Create a user group
Do the following to create a new group from scratch:
Tip! Save time creating a new group by duplicating an existing one. See Duplicate a user group for details.
- Click the plus icon (Add user group) in the upper right corner. The following window is presented:

- Specify a suitable Name.
- Add relevant Roles. Please see Assign permissions to a role for details.
- If applicable, add any relevant Policies. Please see Assign permissions to a policy for details.
- Enter a Description.
- Click Save.
The group has now been created and is available in the grid. Click the group to open its Details panel. See the sections below Edit a user group for detailed information about the different tabs.
Duplicate a user group
You can duplicate a group by:
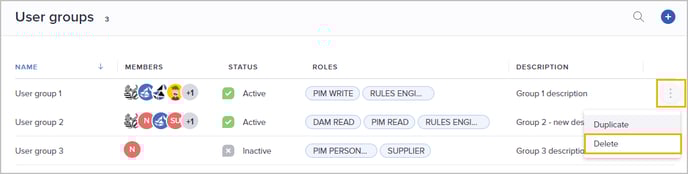
a) Clicking the 3-dots menu of the relevant group from the grid, and selecting Duplicate: 
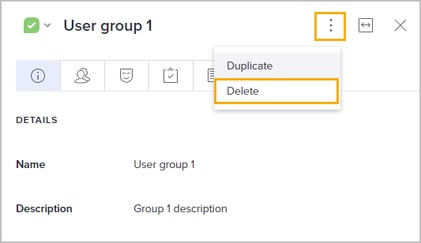
b) Clicking the 3-dots menu from the group's Details panel, and selecting Duplicate:

The new group will appear in the grid and be named "Copy of [name of duplicated group]". Please see Edit a user group on how to proceed.
Edit a user group
Do the following to edit an existing group:
- Optionally use the Search function to find the relevant group:

- Click the relevant group from the grid to open its details panel.
- If applicable, edit the group's Name and/or Description from the Details tab:

- Go to any other applicable tab to edit information.
Edit members of a user group
Go to the Group members tab.
To add a member, click the plus icon (Add group member) in the upper right corner. Optionally search for a user/filter the list by entering one/more characters. Click the user's name to add him/her as a member:

To remove a member, click the 3-dots menu of the relevant user and select Unassign.

Click Unassign in the pop-up to confirm removal.
Edit roles of a user group
Go to the Roles tab.
To add a role, click the plus icon (Add role) in the upper right corner. Optionally search for a role/filter the list by entering one/more characters. Click the role's name to add it:

Tip! Please see Assign permissions to a role for more information.
To remove a role, click the x icon (Remove) to the right of the relevant role. Confirm the removal by selecting Remove in the pop-up.
Create new task for user group
Once the group is active, you can assign tasks to it. All members can view and perform such tasks.
To create a new task, do the following:
- Go to the Tasks tab and click the plus icon (Add new task) in the upper right corner. The following window is presented:

- Specify a suitable Name.
- Add a task Description.
- Select relevant Context.
- Specify a Due date, optionally with a specific time of day.
- Click Save.
The task has now been created and is available both in the group's Tasks tab and in the Tasks module for all group members.
Assign existing task to user group
Once a group is active, you can assign tasks to it. All members can view and perform such tasks.
To assign an existing task to the group, do the following:
- Go to the Tasks tab and click the arrow icon (Assign existing task). The following page is presented:

- Optionally use the Filters to find relevant task(s).
- Select one/more tasks from the grid.
- Click Save.
Edit policies for a user group
Go to the Policies tab.
To add a policy, click the plus icon (Add policy) in the upper right corner. Optionally search for a policy/filter the list by entering one/more characters. Click the policy's name to add it:

Tip! Please see Assign permissions to a policy for more information.
To remove a policy, click the x icon (Remove) to the right of the relevant policy. Confirm the removal by selecting Remove in the pop-up.
Activate/deactivate a user group
Once a group is created, it's by default deactivated.
You can activate/deactivate a group by:
a) Switching Status directly from the grid:
b) Switching Status from the group's Details panel:

Warning! Upon deletion, the members will lose the roles (and thereby the permissions) associated with the group. The tasks assigned to the group will remain but not be assigned to anyone.
You can remove a group by:
a) Clicking the 3-dots menu of the relevant group from the grid, and selecting Delete: