Attributes
Add Set/edit value View, compare and restore historic value Remove
Categories Relations Product issues Assets
Tasks History Variant Variant group Languages
General
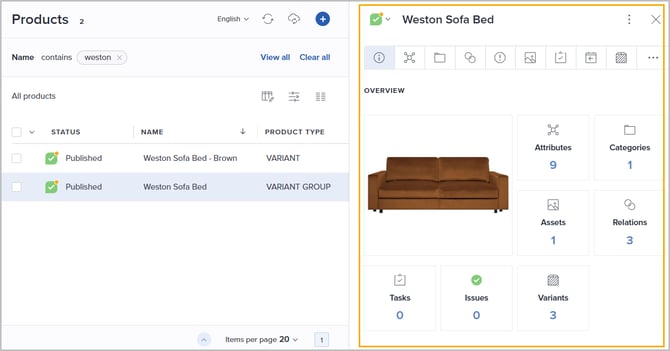
The product Details panel is a centralized view of all information linked to a product, including attributes, categories, relations, assets, tasks and more. The information is neatly organized in various tabs for easy access.
The details panel is opened once you click a product from the grid:
Please see the following sections for details about the information found in the various tabs.
Main product functions
Click the 3-dots menu in the upper right corner to access the main product functions:
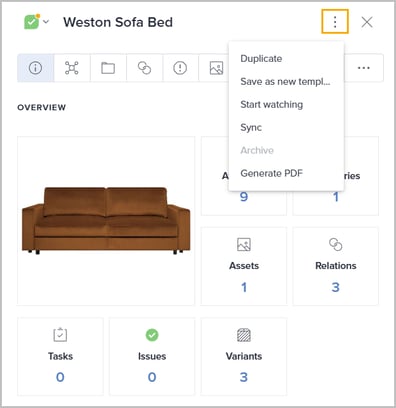
- Duplicate
Lets you copy the product information to a new product. - Save as new template
Lets you save this product as a template that can be used as basis when creating new Single products. Please see Create and use product templates for details. - Start watching
Lets you follow any updates on this product. The product will be added to your Watch list and you will be notified according to your Notification preferences. - Sync
If the product is ready to be published/unpublished or is published and has unpublished changes, it can be synced directly from here. Please see Product status and publishing workflow for further details. - Archive
If the product is no longer part of your portfolio, it should be archived. A product must be in status Draft in all contexts before it can be archived. Please see Archive products for details. - Generate PDF
Lets you create a PDF document containing product information defined by the selected template. Please see Generate a PDF file for a product for details. - AI enrich
Lets you utilize AI to enrich product attribute values. Please see AI enrich for details. - AI linguist
Lets you utilize AI to perform spell checking, text improvements and translations. Please see AI linguist for details.
Overview
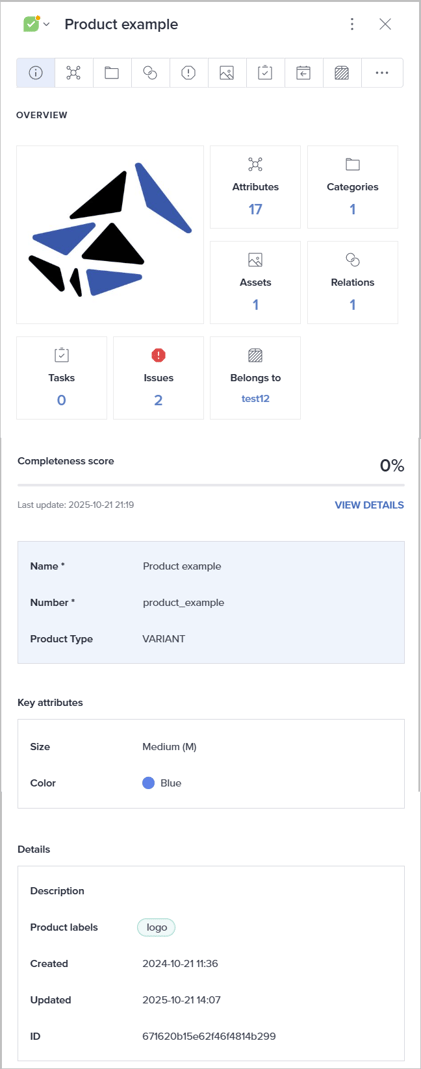
The Overview tab brings together key product information in one clear, easy-to-read view. Here, you can quickly assess a product’s overall status and identify any missing or incomplete data at a glance:
The Overview tab is divided into 4 sections:
- Asset thumbnail and widgets
Presents a summary of each connected entity. Some widgets are always presented, while others are only relevant to specific product types.- Click the asset to open an enlarged preview.
- Click a widget to go to the corresponding tab. By clicking View details in the Completeness score widget, you'll be routed to the Product issues tab.
- The Name, Number and Product type
Normally, only a few users within an organization are allowed to edit the product name and number. - Key attributes
This section presents up to 10 key product attributes defined at the organizational level. There can be different sets of attributes for the different product types. - Details
Displays the Description and any associated Product Labels, along with the ID, Created Date, and Updated Date fields.
Please note that the ID and date fields are read-only and cannot be edited.
To edit information, click the relevant field, input a new value and press Enter or click the green checkmark to save.
Attributes
The Attributes tab provides a comprehensive view of all the attributes associated with a product, divided into sections per attribute group. This includes information such as the product's brand and weight.
Note: Global attributes share their values across all contexts, and are marked with a globe icon (see image above). Please see Create an attribute definition for detailed information.
The following functions are available from the action bar at the top:
- Refresh the attributes tab contents.
- Search for an assigned attribute.
- Change view type.
When the details panel is minimized, you can choose between Comfortable and Compact mode. When the panel is expanded, you can select between four different view types:- Comfortable, 1 column
- Comfortable, 2 column
- Compact, 1 column
- Compact, 2 column
- Open/collapse all attribute groups.
- Add attribute (see the next section).
Add an attribute
Click the plus icon (Add attribute) in the upper right corner to add one/more attributes to the product. You can narrow down the list by selecting an attribute group and/or by searching. Click the attributes to be added.

Set/edit an attribute value
Click the relevant field to set or edit an attribute value.
Note: Depending on your permissions, some attributes might not be editable. Non-editable attributes are marked with a pencil icon like this:
Specify the new value and press [Enter] to confirm.

Tip: Bluestone PIM offers AI-powered tools allowing you to save time and cost in the context of creating/improving content for your products. Please see AI enrich and AI linguist for details.
View, compare and restore historic attribute value
View
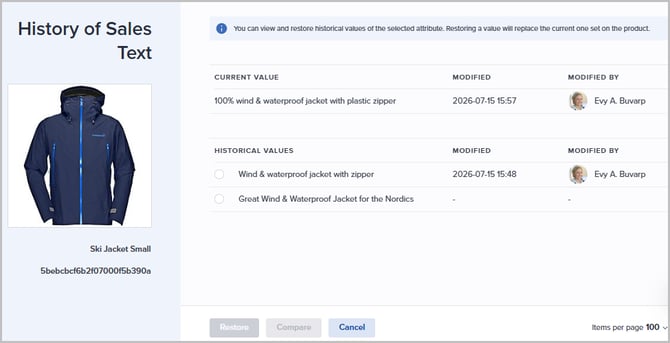
To view the history of an attribute value, hover the input field and click the View history button:

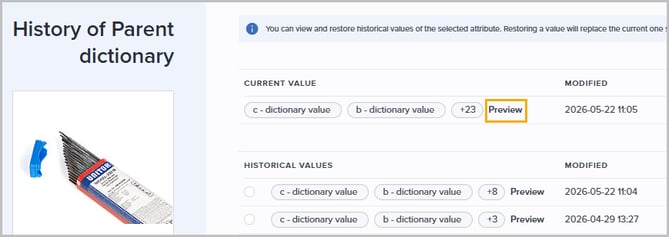
The following page is presented, listing the current and historical values of the attribute, including who made each change and when:
If a value does not fit into the available space (e.g. when a large number of dictionary values are selected), a Preview button is presented:
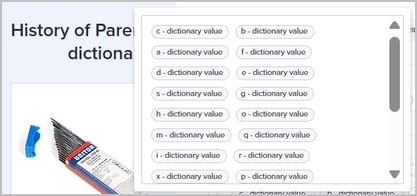
Click the button to view all values in a separate window:
Compare
To compare a historical value with the current one, select the relevant entry in the Historical values section and click Compare:
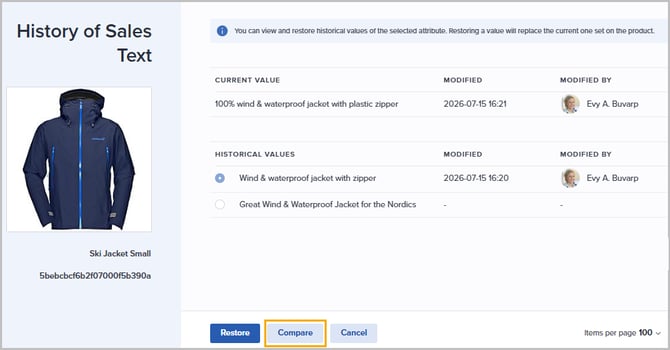
A side-by-side view is displayed, with the current value on the left and the selected historical value on the right:

Available actions:
-
Compare with another version - Select a different timestamp from the dropdown in the upper right.
-
Restore - Restores the displayed historical value.
-
Go back - Returns to the history list.
-
Cancel - Returns to the attributes tab.
Restore
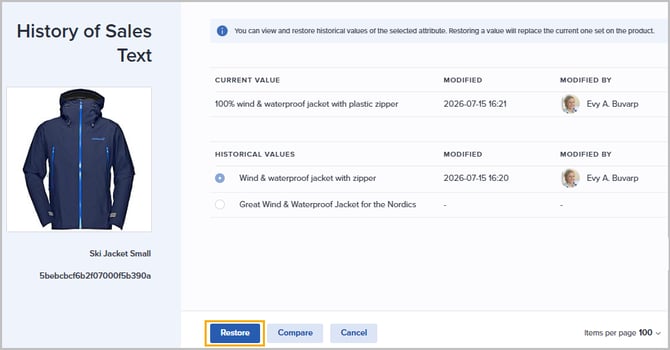
You can restore a historical value, either from the compare page (see previous section), or from the history list.
From the history list, select the relevant historical value and click Restore:
Remove an attribute from product
To remove an attribute from a product, hover the attribute and click the X button to the right.

Click Remove in the pop-up to confirm the operation.
Categories
The Categories tab provides an overview of which catalogs and categories the product is linked to. 
The following functions are available:
- Edit categories
Click the pencil icon to add/remove the product to/from one/more categories. The following page is presented: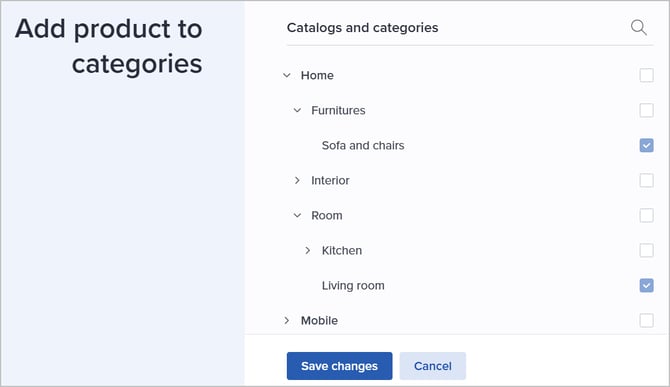
Select/deselect relevant catalogs/categories, and click Save changes when you are done. - View path
Click the button for a linked category to see the whole path. When viewing the path, you can:
- Copy the path as text for reference outside PIM by clicking the copy button.
- List the products residing in one of the categories by clicking its name/breadcrumb.
- Click Hide path to close the category information box.
- Edit category
If you have permission, click the pencil icon to open the category itself in edit mode. - Remove
Click the x button to the right of a linked category to remove the product from it.
Tip! Go to Create and manage catalogs and categories for details.
Relations
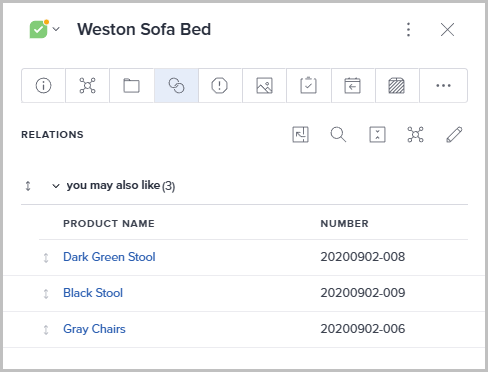
From the Relations tab, you can get an overview and manage this product's relations to other products.
The following functions are available from the Relations header:
- List all related products in grid
Instantly load all related items into the product grid to perform bulk updates, mass exports, or other collective data operations. - Search
Search by relation name, product name or product number to narrow down the list of existing relations. - Expand/collapse
Use this toggle to show or hide the list of products within each relation section. For every related item, the Product Name and Product Number are displayed for easy identification. - Attributes (applicable when the 'Relation Attributes' plugin is in use)
Used for editing predefined relation attributes and/or related products attributes. - Edit relations
Used for adding/removing relations to other products. Please see Add a relation to a product for details.
The following functions are available within each relation section:
- Open a related product by clicking its name.
- Change the sort order of related products by using drag-n-drop.
- Click the x button to the right of a related product to remove the link between these two products.
- Click the x button to the right of a relation to remove all product links for this relation.
Tip! See Relations management for information on how to define the different types of relations.
Product issues
The Product issues tab presents the completeness score and any issues, such as missing information. From here you can proactively manage your product data and ensure that all information is accurate. This will help you avoid potential issues when synchronizing products to be published.
The information is divided into two sections; Completeness requirements and Other validations.

Please see View completeness score for more information.
Tip: See Create a completeness requirement for information on how to define requirements.
Assets
The Assets tab offers an overview of all the assets linked to a specific product, such as images or videos. This tab enables you to manage the product's assets effectively.
Tip! You can click an asset thumbnail to open a larger preview.

The following general functions are available from the Assets header:
- Click the Change view type button to switch between Tiles and List. In the latter case, the asset name, description, and labels are presented. If you have access, the information can be edited directly.
-
Upload a new asset to the library and assign it to the product.
-
Download all assets assigned to the product to a ZIP file.
-
Assign an existing asset from Bluestone PIM's assets library (DAM).
The following functions are available for each assigned asset, by clicking the 3-dots menu:
- Open the asset in the assets library by selecting Show in assets.
- Download the asset file to your computer by selecting Download.
- Remove the asset from the product by selecting Unassign.
- View a list of all products linked to this asset by selecting Go to linked products.
Tip: Please see Assets for more information about managing assets.
Tasks
The Tasks tab gives an overview of all tasks linked to this product:

The following functions are available from the Tasks header:
-
Switch between viewing All or only Unresolved tasks.
-
Mark all done by clicking the checkmarks button.
-
Add product to existing task by clicking the arrow button.
-
Create a new task linked to this product by clicking the plus button.
The following functions are available for each task:
- Set a task to done by clicking the checkmark icon in front of the task name.
- Remove the link to a task by clicking the X button to the right.
Tip! Please see Create a new task for more information.
History
The History tab provides information about all changes made to the product, including who/which service made a change and when. Only entries applicable to the selected context/language are presented.
Note: History entries are kept for 6 months.

The following functions are available from the History header:
-
Search for specific event/entry.
- Switch between viewing entries in descending order by time (List) or By sync. With the latter option, you can see which changes that were included in which sync process:

Variants
The Variants tab is available for Variant groups, and gives an overview of all variant products in the group. The Name, Number and values of any variant-defining attributes are presented for each variant:

The following functions are available from the Variants header:
- Switch between Compact and Comfortable view type. In Comfortable mode, you can edit the value of any variant-defining attributes. In Compact mode, the variant sort order can be defined by using drag-n-drop.
- List all variants in the grid by clicking the arrow button.
- Click the plus button to add a new variant to the group.
The following functions are available for each variant:
- Click a variant's name to open it directly.
- Hover a variant and click the copy button to copy its name.
- Hover a variant and click the X button to remove it from the group.
Variant group
The Variant group tab is available for Variants, and gives information about which group the variant belongs to, and an overview of the other variants in the group:

The following functions are available:
- Click the X button in the Variant group header to remove the variant from the group. This will result in the variant being converted to a single product.
- Click the variant group's name to open it directly.
- Click a variant's name to open it directly.
- Hover a variant and click the copy button to copy its name.
Languages
The Languages tab allows you to easily translate product information.

Do the following to edit/translate product information:
- From the Languages header, select the relevant contexts/languages.
A column for each language is presented. The information/attributes are grouped. General info is presented at the top, and the different attribute groups follow.
Tip! Maximize the panel to make editing easier, by clicking the arrow button in the upper left corner of the details panel.
- Click the field you want to add/edit the value of.
- Press Enter or click the green checkmark to save your changes.